@exeonnecroz
Active 10 years, 9 months ago-

SmartApe joined the group
Gunpla TV 9 years, 8 months ago -
kalumpunkboy joined the group
Gunpla TV 9 years, 8 months ago -
Nyshiro joined the group
Q/A & Help Group 9 years, 8 months ago -
Meijin the 5th posted an update in the group
Q/A & Help Group 9 years, 8 months agodoes anyone here know how to unassamble gunpla parts?
-
Very carefully, If you plan to paint after building i recommend that you trim up the posts to ease in dis-assembly.
-
you can use something like an exacto blade to pry them apart. they also make part separators of models as well.
-
there’s probably a guide around but the basics are trimming the posts before assembly as was already mentioned. What the means is simply a 45 degree cut on the peg to make it easier to pull back apart. the other thing is that prying apart, and anything that can slip between the cracks and is sturdy enough will do, so yeah knife blades, though…[Read more]
-
i also recomend if u were to plan ahead and decided to paint the kit as u were building it dont assemble the stuff that is impossible to come out when ur trying to unassemble the gundam done that a few times not a pretty sight at all
-
-
-
wldeyoung posted an update in the group
Gunpla TV 9 years, 8 months agoJust paid for the shipping on my PG Unicorn and LEDs. Im so excited!
-
Kim W. Andersson joined the group
Gunpla TV 9 years, 8 months ago -
Meijin the 5th posted an update in the group
Q/A & Help Group 9 years, 8 months agodoes anyone here ever painted the beam sabers?
-
yea i usually paint them up with some clear red if its pink to make it looks more darker and intimidating but ive tried turning a pink saber into a blue one with some metallic blue paint itll look nice too so whtever u want for a color change from red to whtedver color i suggest using metallics but if u wanna make it darker just use some clear red
-
ok thx
-
-
If you really want a color change, it’s better to cast them in a different color yourself. You can get a resin casting set for rather cheap, as well as any other supplies you need. You can use that to make clear parts in pretty much any color you want. You can always paint them if you prefer, however painting them even with clear paint doesn’t…[Read more]
-
-
HamzaGrade posted an update in the group
Gunpla TV 9 years, 8 months agoHi everyone just wanted to know if anyone can translate the color guide for the HGUC Hyakushiki & Mega Bazooka Launcher I tried looking for but couldn’t find it
-
Do you have any pictures?
-
-
Jade Gray posted an update in the group
Q/A & Help Group 9 years, 8 months agoHey guys I was wondering how some of you all come up with custom paint jobs. like what gives you the idea or how do you konw it will look good??
-
I think it’s different for everyone. mostly I think it’s just going about your everyday life when you see something and get to thinking, “hey what if?” and from that “what if” you go about your idea. it’s not really something that’s simple to explain cause it really could be anything. if you like a color maybe you just want to work it in then…[Read more]
-
personally i just throw some paint on a kit and hope it dosen’t look like crap. My Sazabi Ver Ka is the prime example. Im working on a custom color nu-gundam right now and im thinking about a color scheme for my hi-nu with the HWS. I’m thinking about replacing the purple with a burnt orange but im still in the planning process on that one.
-
Generally I’ll refrain from a full paint job on my Master grades, as the white plastic generally looks better then any white paint, lol. I will paint certain parts to fill in the areas that are the wrong color.
Other then that, custom paint jobs are related to whatever theme I’m going with. So generally, my kits will see mostly military style…[Read more]
-
for me i just think about the gundam and then look up online at some cool kits and then get an idea out of it usually i keep it in my mind and imagine it if it would look nice
-
-
research, for me I look some similar kits with customs paints online then if I’m not satisfied or something pop-up on my mind i will try the color scheme by providing a linework of the kit then photoshop to try the formulated color scheme. If the color scheme is bad on the photoshop, I will not continue the scheme then try another one.
-
-
SquirrelArmada joined the group
Q/A & Help Group 9 years, 8 months ago -
Jade Gray joined the group
Q/A & Help Group 9 years, 8 months ago -
PKKite posted an update in the group
Q/A & Help Group 9 years, 8 months agoFor cleaning nub marks should I?
1. cut most off with a knife.
2. File the rest down with a file.
3.sand it smooth with sandpaper.
Also what sandpaper should I use?
Currently own: http://www.hlj.com/product/TAM74016/Sup
Dont know if to get this – http://www.hlj.com/product/TAM74047/Sup or http://www.hlj.com/product/TAM74108/Sup for tweezers?
This…[Read more]-
Well after cutting it from the runner, use your cutters to clip off the excess gate. From there you can use a file. always file in one direction, never back and forth, and try to keep the file straight and flat. A few passes should be enough to get the gate down and even with the rest of the part without scraping the rest of the part. from there…[Read more]
-
As for cleaning the nubs, Slater4u covered this excellent. He tells it how it is. I only suggest finishing sanding with a 1000 grid and use a 800 grid before that and after the 600 grid, since you’re not planning on painting and use Gundam Markers to get rid of the discoloration. A 600 grid still leaves scratch marks.
Also get the 800 and 1000 in…[Read more]-
i do plan on using my gundam markers for the cut areas do i still need 400, 600, 800, and 1000 grit papers?
-
I recommend you do. Anything less then 800 will leave visible scratches, even when painting on the the area’s with Gundam markers. As the paint in the markers is really thin, they won’t fill up scratches. For a really good result I suggest even using a 1000 grid to get it really smooth.
And I forgot to mention in my last reply, for decals, water…[Read more]
-
-
-
-
Poophead125 posted an update in the group
Q/A & Help Group 9 years, 8 months agoDo you need to use any primer if you’re going to paint a metallic color on a piece?
-
Primer is primaly use as a base so that paint sticks better. Other method is thoroughly was your runner using soap. Other than that is that when you prime all the imperfectness of the surface can be clearly seen and easily sand to get the perfect surface and end result.
-
for a metallic paint you want to lay down a gloss black before the actual metallic color you want, whether or not you use a primer before this I suppose could be considered optional but I’d do it. When working with gloss paints you can’t really do touch up work, it shows too much, and if you’re doing metallic you’re probably not going to want to…[Read more]
-
Thanks!
-
-
-
LEgGOdt posted an update in the group
Gunpla TV 9 years, 8 months agoIs it ok to use a Sharpie or for that matter any of these other Markers for Panel Lining?-
It will be better if you buy Gundam panel line marker.
http://www.hlj.com/product/GNZGM01/Sup -
OK I checked out the price in the link you gave me and I have to say it is actually cheaper to getting it there than it would for me to buy it from Amazon since they’re asking a min. $1.99 +$3.65 s&h and a max at $15.63+$13.99 s&h. So what would I really have to pay for the lining pen?
-
I don’t know if u live in the US but if u do go to a Michaels (craft store) and look for MICRON brand fine line pens and get the 005 black pens. I can guarantee u that’s the best panel line marker u will ever get. Make sure is micron 005 hmmk? Sadly there’s never a gray marker (to panel line white parts) maybe they don’t even make gray. And if u…[Read more]
-
-
PKKite joined the group
Gunpla TV 9 years, 8 months ago -
PKKite posted an update in the group
Q/A & Help Group 9 years, 8 months agoI will soon be doing my first model and was wondering if anybody could tell me if I’m doing it in the right order? Is it assembly > stickers > panel lines > then a flat topcoat. I’ve heard and seen different things about topcoat ruining stickers/ panel lines is this true?
-
You want to do your panel lines before the stickers. Some of the stickers will cross panel lines.
-
It is one of the orders you could use. Putting a flat coat on top of the panel lines is possible, but not if you plan to use Gundam Markers and a lacquer based clear coat on top of that. The water based ink from the Gundam markers will be dissolved and start to run. Had this problem once in the past. Made a big mess of the piece. Using a acrylic…[Read more]
-
What he’s referring to, is that some clear coats, namely lacquer and some enamels, will ruin the sticker. Enamel clear coats can cause the ink on the sticker to liquefy, and Lacquer clear coats can actually dissolve the sticker.
-
-
http://www.gundamplanet.com/mr-top-coat-spray-88ml-flat.html so since this is water based it wouldnt run the gundam panel line marker (which i belive is oil based)?
-
It won’t be a problem. But as the description says, use fine coats. I thought the markers where alcohol based, but my Japanese is a little off, can’t read the label. LOL. But I could be mistaken tough.
But anyways, it give you no trouble whatsoever
-
-
I think the right method for Out Of Box(OOB) built is
Snap fit>Panel line>Stickers>Top CoatIf using waterslides I prefer
Snap fit>Water Slide>Gloss Coat>Panel Line>Matte Top Coat -
I think (in my own opinion) for the whole process (not painted)
cleaning numb marks>snap fit>clear coat or gloss coat(optional)>panel line>clear coat>decals/stickers>clear coat>final coating if you want shine effect used gloss or clear, but if you like matt effect used flat coats. Gradually apply 2 to 3 thin coats.
-
-
PKKite joined the group
Q/A & Help Group 9 years, 8 months ago -
LEGO1 joined the group
Gunpla TV 9 years, 9 months ago -
LEgGOdt posted an update in the group
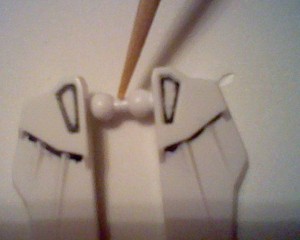
Q/A & Help Group 9 years, 9 months agoI want to cut this part in two in the area depicted in the picture below. But what I’m worried about is that when I do cut it in two will they still stay in place even when I move them around to pose my HGAC 1/144 Wing Gundam-
not quite sure I completely understand the question, but if you’re asking if those skirt pieces will fall off the kit when you try posing then no it should be fine, the ball segments should hold it in place just fine still. If you’re asking will they flop around more then that is a possibility which can be fixed by letting a thin layer of glue…[Read more]
-
Thanks and what glue should I use in the event that the front skirts don’t stay in place?
-
I believe standard practice is super glue since it’s thin and dries pretty fast, but in theory any glue should work. all you’re trying to do is add just a bit of thickness to create extra pressure which in turn means more resistance to movement, don’t overdo it though or it won’t be able to move at all or worse yet won’t even fit.
-
OK and I really don’t want that to happen to me. Especially since this is my vary first Gundam Model kit.
-
Hey after I thought about cutting the front skirt in two. I went ahead and cut it in two and to my surprise the two halves stayed in place once I put them back on the Gundam
-
It depends on the kit. For the most part, you should be fine, but with several kits, this will work against you. For example, the Age 3 normal(not sure it it applies to orbital and fortress), cutting that part will cause them to continuously fall out, and not thickening of the part will fix it. The sockets they sit in are shallow, and have large…[Read more]
-
I cut all my skirt HG kit as they can pose better
-
Well I got the HGAC 1/144 XXXG-01W Wing Gundam and I’m just a beginner since Wing Gundam is my first kit.
-
-
LEGO1 joined the group
Q/A & Help Group 9 years, 9 months ago - Load More