This is it, ladies and gentlemen. The last segment of Gunpla TV devoted to the Perfect Grade Strike Freedom. It was quite the journey and now we have arrived at our intended destination and we hope everyone who followed along enjoyed watching it as much as we enjoying putting it together (both the kit and the videos). In this last segment Syd shows the Dragoons and how Bandai designed them to give the Strike Freedom its Burst Mode. Bandai’s newest PG is definitely a show-stopper and we are already eagerly looking forward to what Bandai has in store for us with the next PG.
In this episode:
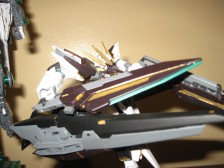
– 1/60 Perfect Grade Strike Freedom Gundam
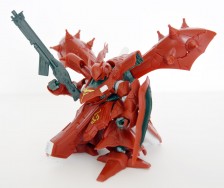
– BB Sinanju
– 1/144 HGUC Geara Zulu (Guards Type)


Charles I. Kim
It’s been a long time since you started the PG Strike Freedom. I guess it’s about time that you guys moved on to other kits. I can’t wait to see what comes next. I also can’t for contests. Even though I probably won’t win, I think I might as well at least try and hope that I do. If I did win, it’d be amazing. =D
Josh
Congrats, Syd! The suit looks awesome!
Orange Pickles
Helly Syd! I had a question!!
When I’m done with kits I do tend to have extra parts left over. Beam Saber beams and extra hands.
I usually keep these stuff in their boxes but what do you do with your extra pieces?
Syd
Hi Orange Pickles,
I have my Sinanju MG box filled with extra parts. I keep them around because I sometimes find a use for them when I am customizing a kit. Extra poly-caps are also a good thing to have at hand.
Rommel
Hi Syd! Great Work! I also finished my PG SF but I’m having problems with the Dragoons… they just don’t lock into place like they should… one or two units would go to full burst mode even if locked them in place… did I do anything wrong? Anyway, congrats and more power!
HLJ : Luke
@ Rommel, Syd is actually away today will get him on this question when he gets back!
George
I don’t have the kit and haven’t seen its “weak peg” first-hand, but I don’t think stuffing it with putty (epoxy putty?) is going to do the trick. Stuffing the hollow bits is going to keep the part from compressing there, but it’s not going to keep it from getting pulled apart. (Epoxy putty bond generally isn’t strong enough for that.) Keeping one side of the peg from compressing could just increase the stress on the opposite side of the peg…
I could be wrong, here… It could be that this mod will be enough to strengthen the peg. For all I know, the weak peg issue may not even be as much of an issue as I’ve heard… But if I were working on this part, I’d probably pin it… Or at least stuff it with something that’ll have a strong bond – like super glue + talcum or similar commercial products like SSP-HG.
The thing to remember when dealing with a problem-part is that it’s almost always easier to reinforce a part before it breaks than to repair it after it breaks…
HLJ : Luke
@ George, agreed but in this case we just went with the putty to stop it from flexing. As we mentioned in the video more advanced methods would give better results.
George
Well, if breakage really is a problem, “better results” means “the part won’t break”, right? Is it really worth addressing the issue in a way which (I suspect) doesn’t fix it?
I would think that stuffing is just going to make the peg less resilient without making it much stronger. Again, I could be wrong, here, but I kind of don’t think so…
HLJ : Luke
@ George considering we have extremely easy access to spare parts i don’t foresee breakages being a real issue, with care the part will not break. But if you don’t have easy access to parts like we do and you would like to truly make it stronger please follow the correct methods to suit your situation.
Chris
The freedom is done good! Syd just woundering what mobile suits that have not been made into a modern kit would you like to see? Im refering to kits that were made in the 80’s from zeta and double zeta that have not seen a HG or MG kit. Im still praying for a galbaldy beta to be made into a HGUC 1/144 scale kit since thats the only scale i build i was verry discouraged when they did the B-club thing i hate when they do that.
Syd Sked
@George,
You’re right. “better results” means the part won’t break”. And… the park didn’t break, and still hasn’t broken. But more to the point, these Strike Freedom videos have been longer than previous episodes and we don’t have the time to show the various ways you could fix this part which is why I mentioned the possibility of using metal rod and also the metal ring. Luckily for everyone, Hobbylink.tv puts up a lot of user content so feel free to show everyone how you would address this kind of problem.
GamerOra
I blushed in shame as you made your oops. I made the same mistake, and didn’t realize it til “cracksnap.” T-T So glad the the pegs that attach the dragoons to the backpack didn’t break on mine. I had no clue people were having trouble with them. I enjoyed watching you build this kit. The half and half looks really good too. Shows all the work and detail that goes into these kits. Though it does look a lot less meaty without it.
Ratamorph
This model looks very cool, I own the PG 00 kit and I was wondering in your personal opinion which kit is better, leaving looks aside. The 00 has so many features, while this one just seems like a super sized strike freedom with a gold inner frame.
HD Gundam
Great video from Hobby Link TV… Hope for more gunpla review
Unitzero1
Poor guy had to assemble those beastly Dragoons! Cheers, he looks beautiful!!
240082Exia
Thanks Syd for helping me with the tips to build the PG Strike Freedom easier. I appreciate the work you have done on the dragoons
You rock