by Mario Covalski, Editor at modelersite.com
Building the M50 in 1/16 scale is a project I have had in mind for many years, and after the M51s (from the article published in May 2012) I felt the need to continue with this one. In this article, I’ll share with the reader my experience in building the M50 RC 1/16 from a Tamiya M4 -105mm with HVSS suspension.

Tamiya M4-105 kit
Choosing the version
In March 1956, the IDF’s armored forces received the first M50 tank straight from the assembly line, they came to replace the old M4A1E8, it was the M50 Mk1. Basically, most of them were built from the M4, M4A1 chassis, etc fully restored, with radial engine, turret modified called M50, was armed with the French high-velocity 75 mm gun CN 75-50 with VVSS suspension.
For this article I used as reference the book Lioness & Lion of the Line, Vol.1. by Dr. Robert Manasherob, as well as pictures found on the Internet. It’s possible to see that there were so many versions of M50 Mk.1 impossible to imagine, combining any Sherman chassis bought in Europe, USA or captured, with the new M50 turret modified starting from a M4 turret.
With the arrival of the M51 project in the early 60’s, the Israelis used to upgrade all of their M50s converting them to HVSS with new engine deck that had been suitably modified for the Cummins diesel engine. It was called M50 Mk2 which is the subject of this article.
Although the Tamiya kit supplies HVSS suspension, I like it versus the VVSS, so my project should be a Mk.2, besides of being more showy since it had side stowage boxes, more cans…etc.
The 1/16 M50 is born
The project started with a Tamiya kit which supplies a 47º welded hull. This was not the hull I desired, though, there were M50s with it. Once again my friend, Nick Aguilar helped me. Last year, he had cast a resin 57º M4 with parallel access hatches representing an early M4A34.

If you don’t have another hull, you may use the Tamiya’s; in fact in the Israeli Armour Museum at Latrun, there is a M50 with HVSS suspension and 47º welded hull similar to the Tamiya release.
On the other hand the turret should be entirely remodeled to be converted into a M50, adding the rear counterweight, new mantlet, gun muzzle brake and lift mechanism. In order to make it more showy, I chose to place an early split hatch commander’s cupola.
Summing up, my M50 would have the following features:
57º welded hull with parallel hatches for the driver and gunner.
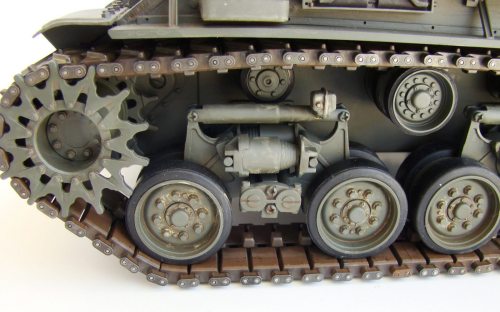
HVSS suspension.
Turret type is split commander’s hatch.
Engine deck corresponding to the Cummins V8 diesel
Construction ( The full article about building can be read in our magazine www.modelersite.com )
To make it easier the understanding of the conversion of the Tamiya M4 kit into the M50, I concentrated myself in the work done leaving minor details to the reader’s interpretation. This is not a model to copy “exactly as it is”, there are parts that were created with a few artistic licenses I took up to facilitate or just in order to make a modification.
Stage 1: the hull
I started with the hull and checked the correct fit with the Tamiya aluminum chassis, then, I just glued the parts C4 to the resin so that it stays held in place.

The hull needed several modifications: enlarge and modify slightly the rear panel, change the engine deck and the front fenders; and extend the sponsons for the HVSS suspension.
Nick’s hull was thought for VVSS, but besides it had represented the extra shield plates which were welded at the sides of the tanks. This meant certain problem cause there are pictures of M50s with VVSS converted into HVSS adding all the stowage hardware over the shield plates and others without them.

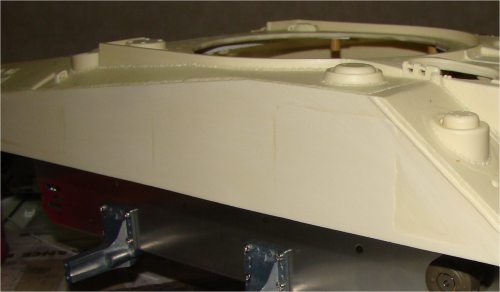
The shield plates were too thick, so I decided to remove them by sanding, an arduous task that required several hours. I left only the marks that had been there as if they would have been removed; with this, I covered both options, a M50 that had them but were removed when upgraded.
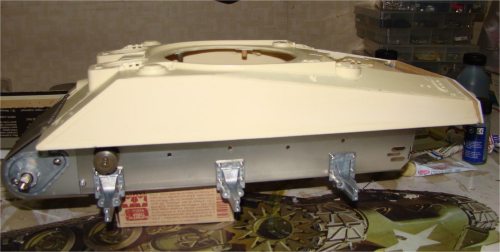
Next step was to remove the sponsons with the front fenders from the Tamiya plastic hull which would not be used. This task was made with the help of a sharp blade scrapping one and again the area of the plastic angle joint.
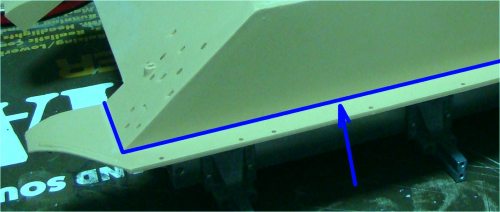
Also I glued plastic stripes under the sponsons exceeding a few millimetres which would be useful to glue them to the hull. The front fenders of the resin hull were cut and replaced with the Tamiya plastic ones which were cyano glued, reinforcing the joint with bronze wire as can be appreciated in the following image.

There were other tasks to accomplish in the hull, cut the engine cover in order to install the one I would scratchbuild later and extend and modify the rear panel. Epoxy putty was used to reinforce the hull’s interior especially in the joints between panels.
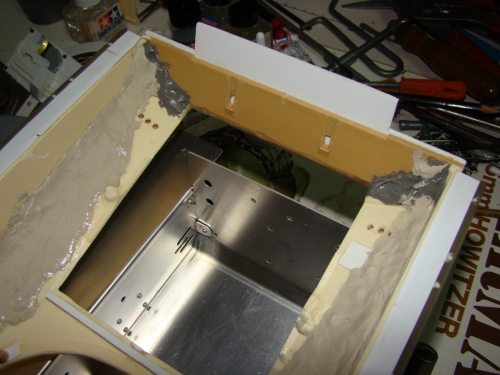
I had to glue the pillars where I would install the turret rotation unit and the guide rollers.

Now the hull was ready for the next stages.
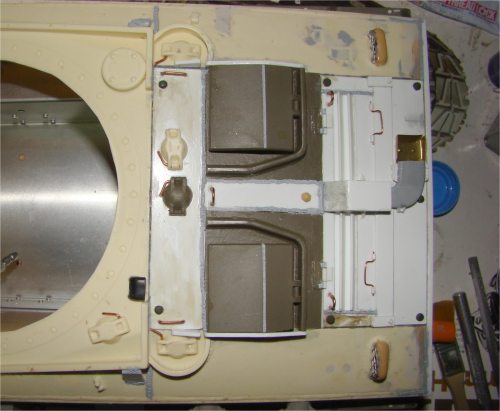
Stage 2: The new engine deck
As well as I did with the M51s, the engine deck should be scratchbuilt.
For the new decks, I took as reference the one provided with the Dragon M50 kit, but made a drawing adapting the measures to the room on the hulls. Note that the Dragon’s deck belongs to the long A4 chassis while the M51’s were the short one.
Take a look to the M51 article for more details or look for the M50 article in Modelersite online magazine.
M50 engine deck as showed in article of July 2012 issue
Stage 3: The turret
When I faced the job of building the turret, I felt the hard and difficult work started.
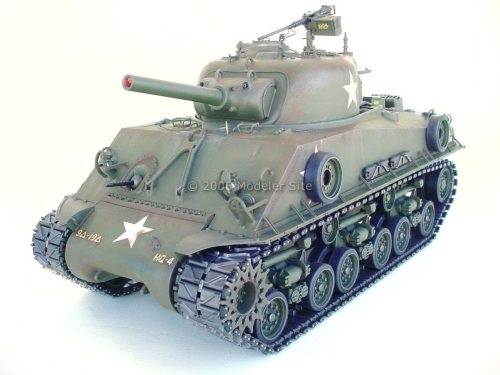
The M4-105 turret supplied with the Tamiya kit is correct for a M50.
The Israelis had converted the M4 105 turrets into the M50, actually the first M50s were called that way due to their turrets, since they were M4A1 with radial engines and modified turrets to M50.
The main upgrade would be the French CN 75-50 75 mm gun with a muzzle speed of 1000m /sec to replace the 105mm Howitzer and M3 -75. Also the French AMX-13 that Israel had purchased from France in the mid 50’s were fitted with a 75mm gun which was based on the German Panther.
There is precise and interesting information in the book Lioness & Lion of the line” Vol.1, if you like the historical aspect of the M50. The views to take the turret’s shape can be appreciated in pages 29, 30 and 31. For copyright reasons, I will not reproduce here such drawings which were scanned and printed in 1/16 scale.
As the recoil of the M50 gun was greater than that of the M4 gun, the back end of the turret was removed and a new rear was welded on.
Other changes were accomplished to the M50 turret such as the lead the rear of the turret was filled with. Change of rear turret fan position and pair of the antenna bases.
Also I added a new forward section for the new mantlet.
Then I should build a new rear section, the mantlet and gun shield. I used drawings of a M50 taken from the above book scanning them in 1/16 scale and printing them in paper. I cut the rear section of the Tamiya turret taking the drawing as guide. The blue line indicates where to cut the turret, the red circle shows where the commander’s hatch should be cut to install the split “early” hatch. The red arrows indicate that the fan as well as the antenna base have to be preserved cutting them with a sharp blade before making the rear cut indicated with the blue line.

The following images show the turret with their cuts. Once the fan was taken out, the hole was covered with plastic from the inside and then polyester putty was applied.

I glued a piece of plasticard on the area cut to prepare the surface so that the new rear section could rest.
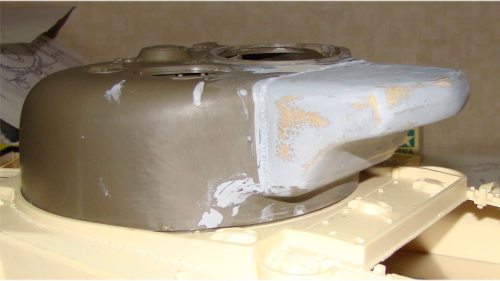
To scratchbuild the new rear part, I used an old technique to make parts from balsa wood.
I got a balsa wood block of a slightly greater size than the new part of the turret. I drew in that block the views taken from the printed drawings, and started to carve the balsa wood with a blade up to getting the approximate shape.
Then, I used sandpaper for smoothing wood, always taking as guide the drawings checking the shapes from all angles.
Once I was satisfied with the result, I applied a lacquer wood sealer and once cured, I sanded with #400 to get a smooth surface. Tamiya putty was applied later in order to create texture.
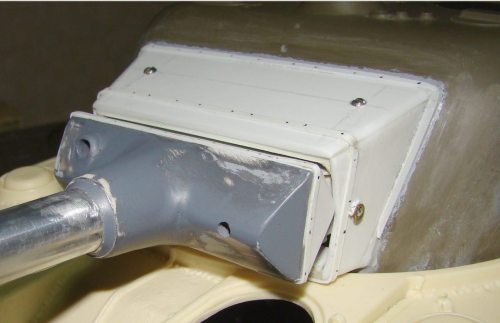
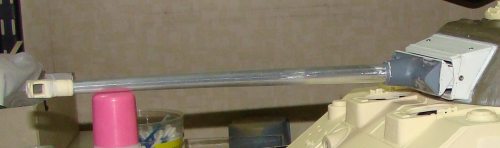
Next step was to build the mantlet and shield, besides I should get a gun, muzzle brake and scratchbuild the gun elevation system. Actually, this task made me feel fear, the shapes are complex and I don’t have special tools such as a lathe…etc.

Details added to the turret
The plastic injected springs were removed from the loader’s hatch and replaced with real ones to scale.

Construction, stage 2
This second stage consisted in detailing. To improve an overall comprehension of text, I will show you pictures followed by their descriptions.
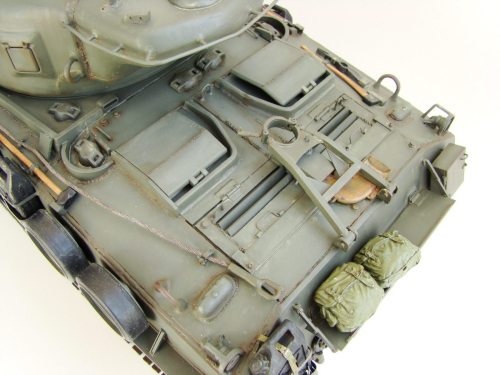
In the following image..
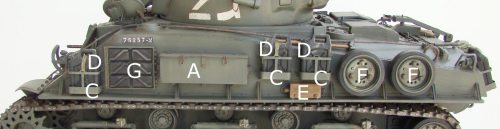
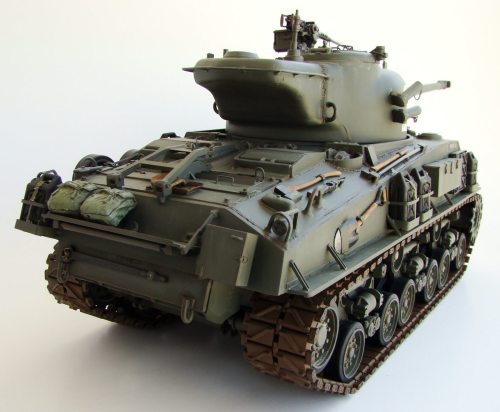
A: They are storage boxes from the Schumo-kits # M510011 made out of resin, and include brackets for the hull. I only used the large ones as the set was designed for the M51.
C: The holder frames for the cans of the fuel and water are photoetched from Archer
D: The IDF fuel cans were different to the american jerrycans. Usually the IDF’ s were painted in black. Fortunately, I could use the ones of the Schumo-kits # M510013.
E: The auxiliary generator exhaust was made from scratch using plastic tube and a sprue bar.
F: The spare wheels holders are also from Schumo-kits.
G: The spare track links and their holders was taken from the Tamiya M51 Sherman Sprue E.
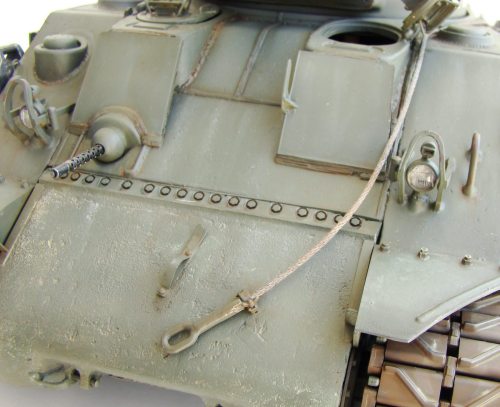
H: The towing cable and mounts are also from Schumo-kits #Sh0027N.
The rear area of the chassis received the Schumo-kits set # SH0023N.
Also I added the external infantry comm. #M510015 to the hull rear panel.
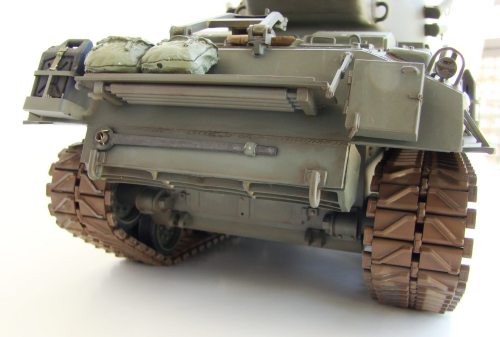
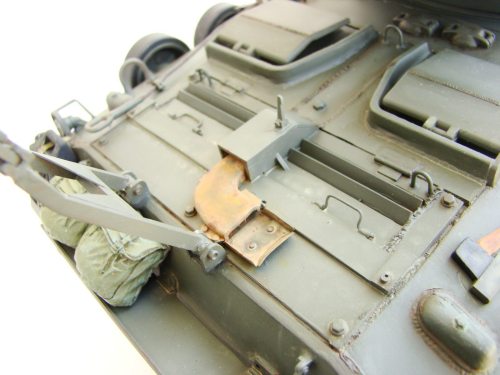
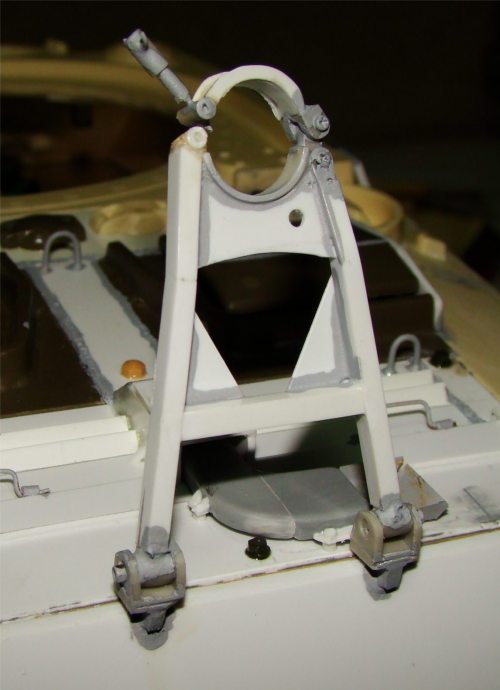
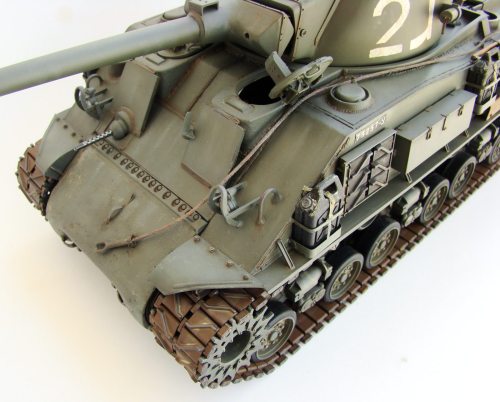
Finally, I had to build from scratch the gun travel lock. It is completely different from the M51’s and of course from the M4’s, this was why I could use neither kit parts nor aftermarket. I used again the book’s drawing in 1/16 scale and several reference pictures that showed the travel lock from different angles. I used plasticard, plastic rod and tube, and much patience.
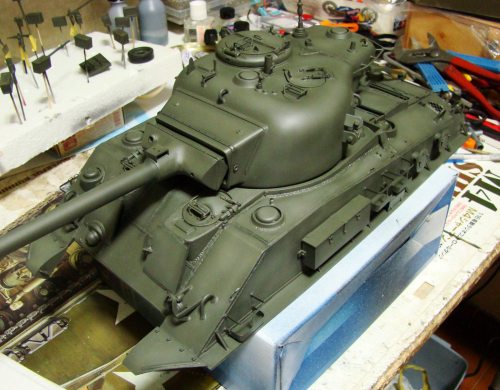
Painting
It’s not the intention of this note to explain the advanced techniques of paint, remember that basically I am a car modeler.
According to what I’ve read and seen in pictures, there were M50 painted in French Olive Drab (lighter than the American) and a Desert Yellow typical of the IDF which is very close to the Buff.
Actually, I wanted a M50 painted green. Until 1961 most IDF tanks were OD, so it did not seem ridiculous that a M50 Mk2 was green. I mixed Tamiya XF 62 with a bit of buff up to getting an almost pastel green.
I used enamel since, have in mind that this is a RC model and would need intensive handling.
Once the OD stage was finished, I lightened the center of the panels with the same OD lightened with Buff, in this way I gave a color faded after the long exposure to the desert weather.
For the weathering, I used acrylics starting from a couple of filters with burnt sienna as well as punctual washes with the same acrylic, and sand, grey, white, rust pigments…etc.
The traces of water were made by applying a point of white acrylic , giving downward strokes with a clean brush wet in alcohol. In this way I accomplished different vertical marks, mixing yellow and white points.
I didn’t consider it necessary to give any drybrushing, but black lead taken from a 6B pencil scraped with a #180 sand, applied with my finger tips on the hatches’ edges, tools…etc.
I painted the tracks with Tamiya enamel XF-64 and gave black and buff washes. Then, white and sand pigments were applied and finally I used abundant graphite for the area where the tracks touch the ground.
The ID plates were drawn and printed in paper to be later glued on the hull. The size should be around 23mm. The PDF version offers high resolution images that can be printed using a laser printer.
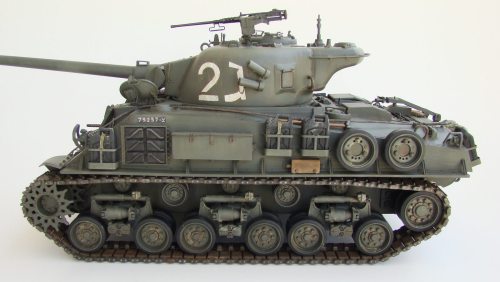
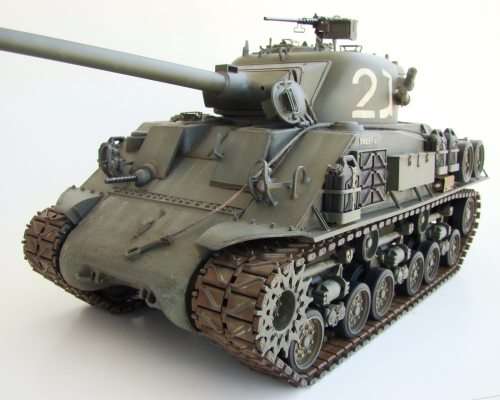
The markings in the turret corresponds to 2 Gimel (Hebrew letter C) belongs to the 2nd platoon, C tank. Using the drawing shown below ( it’s in print size), I cut adhesive masks (from Tamiya masking tape) and once applied on the turret, I painted applying white with a round stiff bristle brush as if it were drybrush but without scraping. In this way the white is irregular and helps to do the weathering.
The full article about building can be read in our magazine www.modelersite.com


panzerdave
Outstanding converion! It’s hard to find good 1/16 conversions as good as this one. Great job.