@leehobby
Active 9 years, 10 months ago-

Ronin posted an update in the group
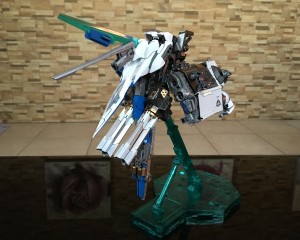
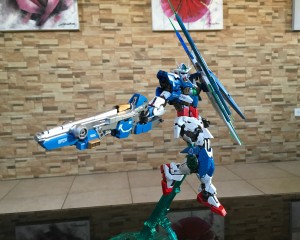
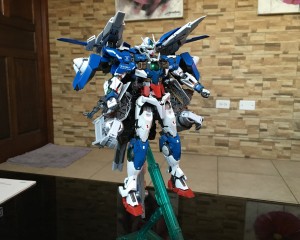
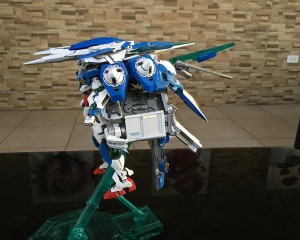
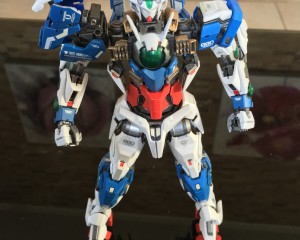
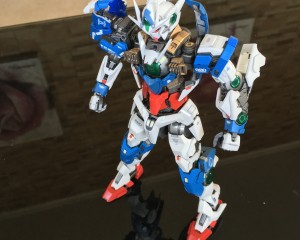
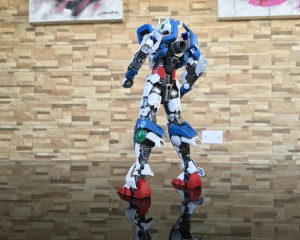
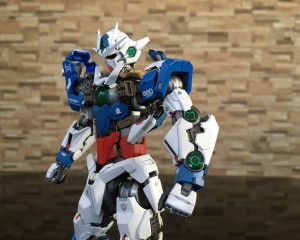
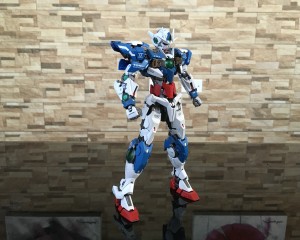
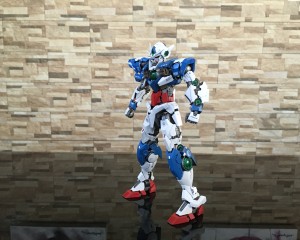
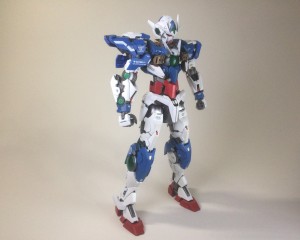
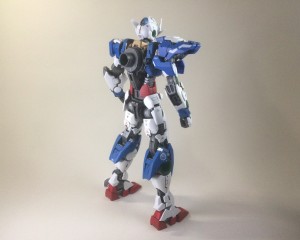
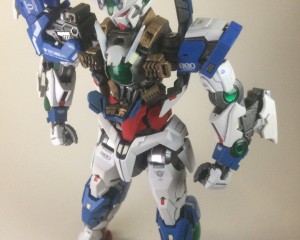
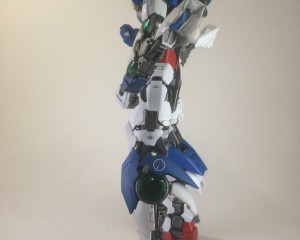
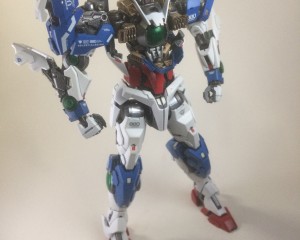
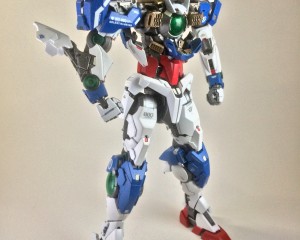
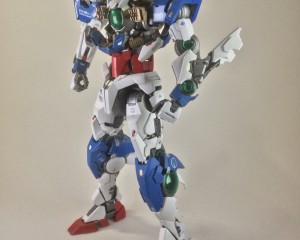
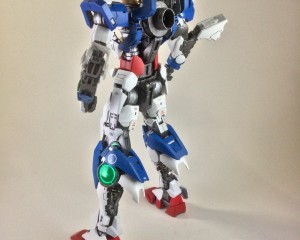
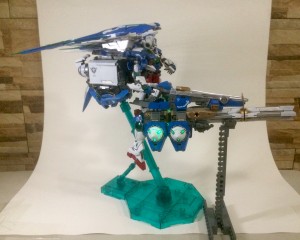
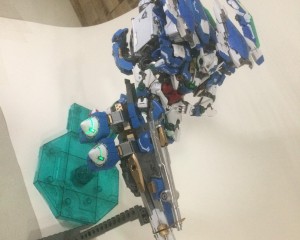
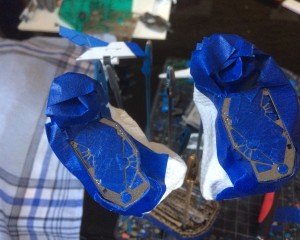
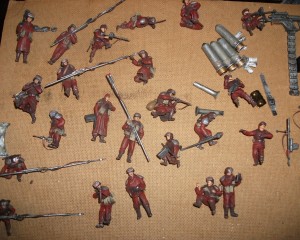
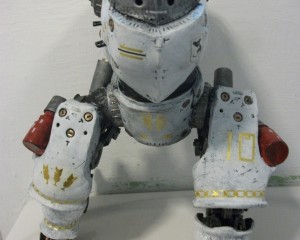
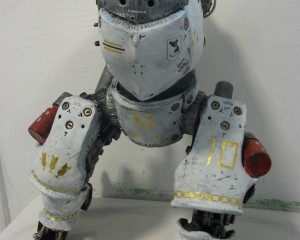
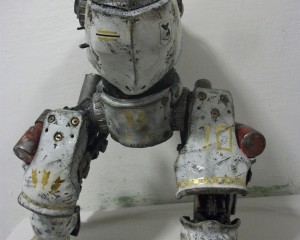
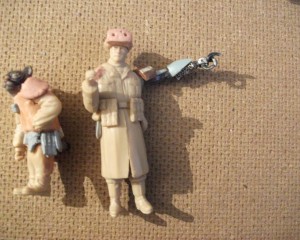
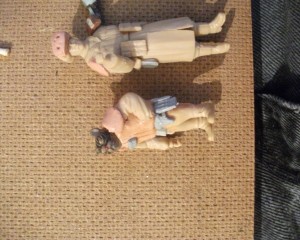
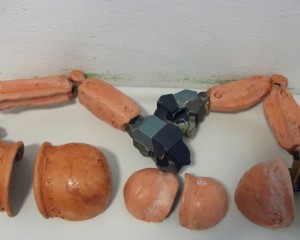
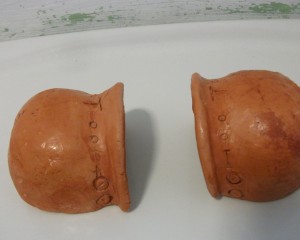
Advanced Modeler – Modeling Competition 2017 7 years agoRetook shots of the kit. This time I feel I have better lighting. I had problems posing the many different configurations. The kit also fell twice and had to glue certain parts. Sorry for spamming. -
Ronin posted an update in the group
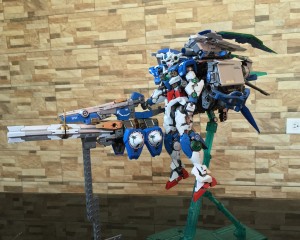
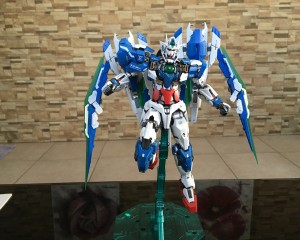
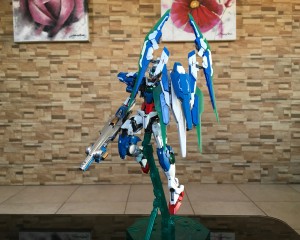
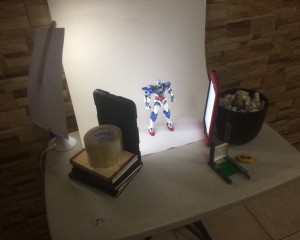
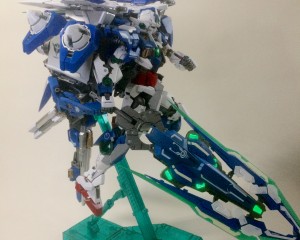
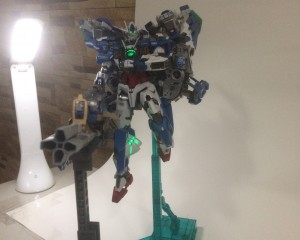
Advanced Modeler – Modeling Competition 2017 7 years, 1 month agoFinally finished!Made a make shift photo studio using 2 iPads from my kids.
HDR is kinda tricky with its color correction. Are we allowed to tweak the color using iOS apps?
These shots are not sent to syd yet.
-
Came out looking great, good luck to ya.
I’m probably not gonna finish my entry in time, work commitments -_- -
Congrats.. super
-
‘The only restriction on modification is that no photos can be touched up in order to alter the appearance of any enhancements, or imperfections of the kit.’ from that I’d assume no, personally
-
Nice!
-
Alright thanks. Then just raw untweaked images for the submissions then.
-
You all are making me look bad. I only just got my parts primed.
-
-
Java posted an update in the group
Advanced Modeler – Modeling Competition 2017 7 years, 1 month agoLast wip images because my memory card on the camera seems to be malfunctioning and eating images so i lost a bunch of stuff and this is all thats left.
Attached the Ragondin…-
If we could vote for the winner, you would have my vote. What you started with and now made it into this is just amazing. Good luck.
-
mud look perfect
-
You are crazy ! Your work is too crazy ! 😀 You are my favorite ! By lucky i’m in the category intermediate ^^”
-
@ Gundam Medic
Once again thank you very much for commenting and following the build and i’m glad you found the buildup interesting and one day i wanna see you build your own monster robot. 😉
-
@ Minarto
Hey thanks.
-
@ Orchidia
Thank you!!! i think we are all a little crazy around here , i’m up against some awesome builds as it is and you never know one of your kits could be bumped up to Advanced and then we would all be in for an even tougher fight. 😀
-
Thank you Java! But I do not hope! The competition is already very tough with 322 participants in my category, so with a hundred crazy like you, I think I will fast drown! XD
-
-
Ronin posted an update in the group
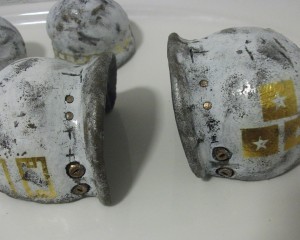
Advanced Modeler – Modeling Competition 2017 7 years, 1 month agoThe last of the masking job is about done. I also painted the last chrome parts and arguably one of the hardest.Then I went on to test fit all of the parts together. I’m…
-
Ronin posted an update in the group
Advanced Modeler – Modeling Competition 2017 7 years, 1 month agoFinals days of the work.Decal work is still in progress. I have a ton of decals to add with 3 sheets of water slides to go through. I also need to find a good balance in…
-
Java posted an update in the group
Advanced Modeler – Modeling Competition 2017 7 years, 1 month agoI think this might be the final wip for this guy maybe.
I’ll look over him for a few days and see if there is anything else i can do to it.Put material around the legs and…
-
The eyes remind me of Sin from Final Fantasy 10
-
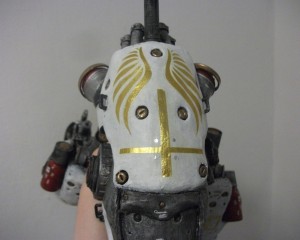
Damn it! Keep the edges, but for gods sake.. show this thing in its full glory. BTW.. the gold decals. Are these real goldfoil?
-
Yeah it does look a bit like it, i havent played Final Fantasy 10 for years, your making want to get the HD versions now.
-
Well i have to keep things suspenseful until it’s finished or it would be no fun. 😉
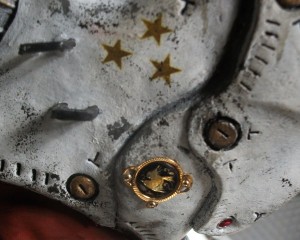
The decals are gold foil i’m pretty sure i bought from hobbycraft a while ago. -
I really like this! The only issue is with the rough texture, but it’s ok since you did weathering. Good luck!
-
Really awesome mate! We’re not worthy 😉
I really dig how smart you use stuff like gold stickers and other card making stuff (like the halfbead peral things).
Paint is ace too. -
@ Enrico Asa no Hoshi:
Thanks!!! i guess.
-
@ Beork:
😀 Thank you very much, it’s suprising really the amount of stuff we can use on models that you would never think about using.
How’s your build going, looking forward to seeing it all complete
-
-
Java posted an update in the group
Advanced Modeler – Modeling Competition 2017 7 years, 1 month ago-
This is looking like a winner!
-
I forgot to ask if you took inspiration from Warhammer? Or is this Warhammer?
-
Hey thanks mate, nah i wouldnt say warhammer more like inspiration from the old manga/anime cartoons like Five Star Stories , escaflowne and Dunebine.
-
The hell… why am I even going on… that hammer!!! You will have my vote too!
-
So it’s a scratch-built battle scene?
-
The creativity and skill that it must’ve taken for you to do this is amazing. I only hope to be a fraction this good some day.
-
Cool stuff!
I like the hamerthing a lot man.
So, the cloth on the arms is just that? cloth? (recalling your comment earlier) -
Thanks you very much, hey don’t give up I want to see your finished dio too. 😉
-
Yep!!, well 95% scratch built, I have used a few toy/model spares for the mechanical parts and the hands.
-
Thank you.
You can make stuff like this and you probably will. I’ve just had a lot of practise at making things that’s all.
-
What is it this time you troublemaker. 😉
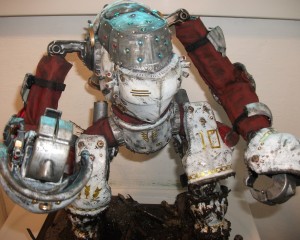
Thanks mate yeah I don’t know what to call the weapon either, looks like a giant deadly plexor that the doctors use to test reflexes. 😀Yeah its red cloth but painted a darker red then a lighter red on top for shading with a little bit of weathering applied, the paint stiffens up the material and…[Read more]
-
-
bloodnut38 posted an update 7 years, 1 month ago
-
bloodnut38 added a Photo 7 years, 1 month ago
-
Java posted an update in the group
Advanced Modeler – Modeling Competition 2017 7 years, 1 month ago-
Just sick.. the complete build?
-
Thanks.
Still have a bit to go not finished yet, maybe in a few days.
Maybe. 😉 -
Wow
-
This is crazy amazing. Are you building a mecha T-Rex?
-
Thank you.
-
Thanks!!
Nah this is the thing that fights mecha T-Rex. 😉
-
-
Ronin posted an update in the group
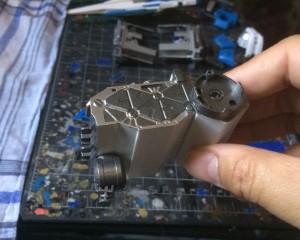
Advanced Modeler – Modeling Competition 2017 7 years, 1 month agoTime to release my focus to update on the progress.Got a lot of work done on the custom connector for the 2 Gatling gear houses. I butchered some GN swords for it.
Added…
-
Java posted an update in the group
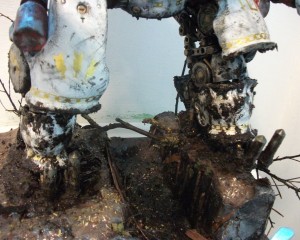
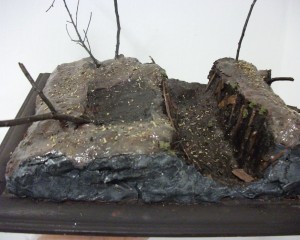
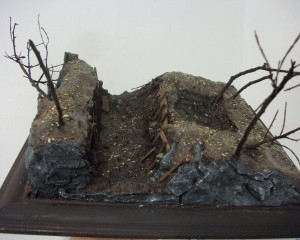
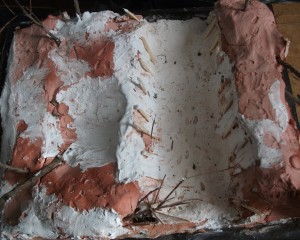
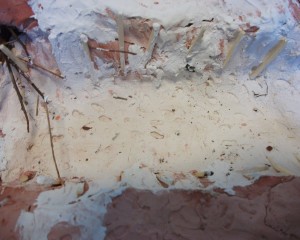
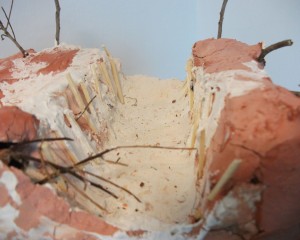
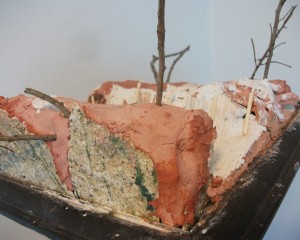
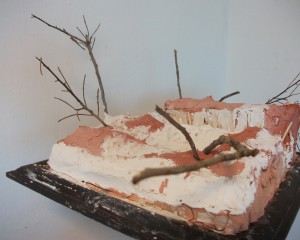
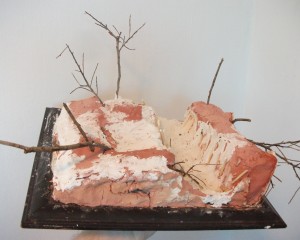
Advanced Modeler – Modeling Competition 2017 7 years, 1 month agoOk painted the base and sprinkled on a little seasoning,i didnt use any 1/35 scale leaves because in trench images the trees have been oblitorated and nothing is left but… -
Java and
Gundam Medic are now friends 7 years, 1 month ago -
Java and
mrKitMaster are now friends 7 years, 1 month ago -
Java and
kaminoan are now friends 7 years, 1 month ago -
Java posted an update in the group
Advanced Modeler – Modeling Competition 2017 7 years, 1 month ago-
It’s looking great, can’t wait to see the painted products
-
It’s got that WWI trench line look to it. This will be great.
-
Thank you mates,glad you like it so far.
-
-
Java posted an update in the group
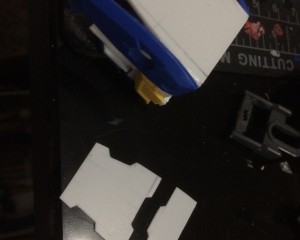
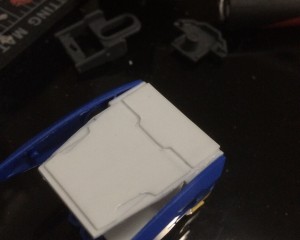
Advanced Modeler – Modeling Competition 2017 7 years, 1 month agoMade a start on the weapon but my camera has took it upon itself to erase a few pictures so what i did i used a fruit shoot bottle and covered it with clay and then made it… -
Ronin posted an update in the group
Advanced Modeler – Modeling Competition 2017 7 years, 1 month ago-
Nice work.
-
-
Java posted an update in the group
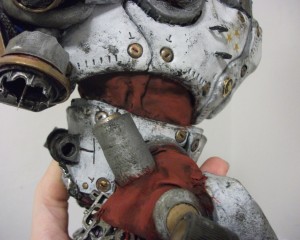
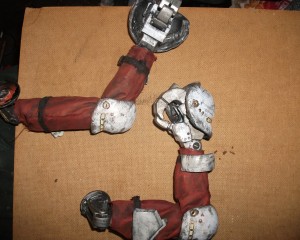
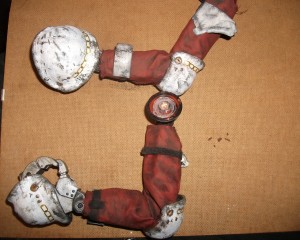
Advanced Modeler – Modeling Competition 2017 7 years, 1 month agoFinished the arms, the hands are from a toy not sure of what but i have been wanting to use them for a while and they fit in nicely, i will need to clean up some of the cracks…-
Armed and dangerous.
-
Well it has been pretty armless up to now. 😀
I am working on his weapon at the moment though.
-
-
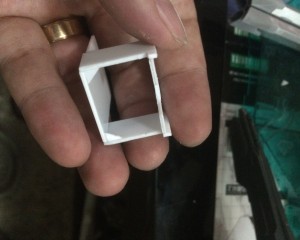
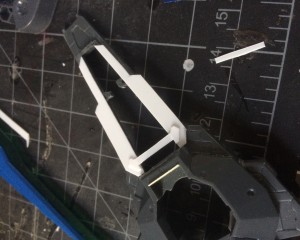
Ronin posted an update in the group
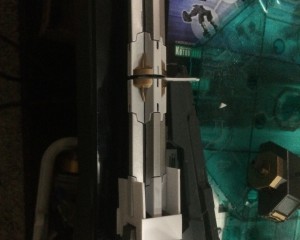
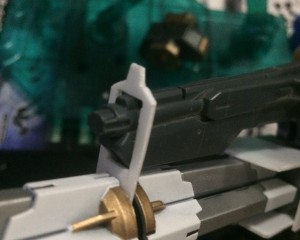
Advanced Modeler – Modeling Competition 2017 7 years, 1 month agoUpdate time. Weekdays haven’t been kind but I did some work on the sword.Some cutting was necessary so the light shines out from the inside.
Did some fabricating from a…
-
What do you use to cut the plastic pieces you fabricated into that part? They are very symmetrical and perfect.
-
Just simple ruler and sharp cutting knife. To make it symmetrical, just use the same geometry from one side to the other and then cut both identical pieces individually. Put them together temporarily with tape and sand them together.
-
Ok thanks for the info. Is there a brand or blade type you recommend?
What is the thickness of your styrene? Sorry about the questions I just have tried many ways of getting good symmetrical pieces and have always had issues. -
I’m using 0.5mm plaplates for the thin panels on top while using 1.2mm plates underneath for a sturdier build. I use tamiya extra thin cement to bond them together.
As for the knife, i merely use an off the shelf hobby knife. nothing fancy. I actually cut my plates really oversized first, then use one cut to shave off the corners. i avoid using…[Read more]
-
Alright! Thanks going to have to attempt this again!
-
- Load More


Awesome work,nice clean decals and paintwork application,i like.
Nice use of Lego! Haha