-

DFWTRARC posted an update in the group
Q/A & Help Group 11 years agoHey quick question about plastic cement. I’m trying to fill seam lines with plastruct brand cement and it’s not working. I put it on the edges of the part and go to snap them together but it like drying or evaporating or something so fast that I don’t have time to even get the 2 pieces together. Am I crazy or is something wrong?
-
Evilcoffeepot joined the group
Q/A & Help Group 11 years ago -
DFWTRARC joined the group
Q/A & Help Group 11 years ago -
Plamobot joined the group
Q/A & Help Group 11 years ago -
tinbore joined the group
Q/A & Help Group 11 years ago -
Nissan skyline r34 joined the group
Q/A & Help Group 11 years ago -
Archaiel posted an update in the group
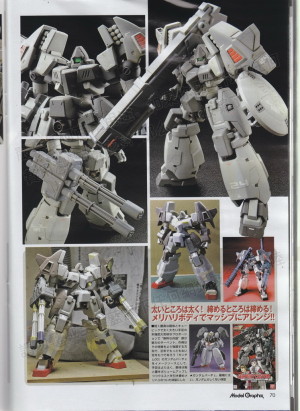
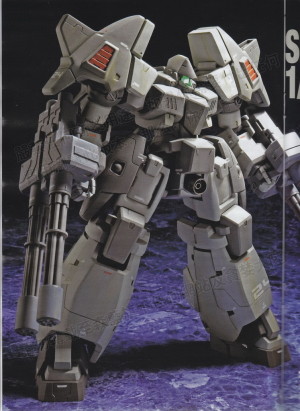
Q/A & Help Group 11 years agoOk, so I have been trying to figure out what was done to this Serpent Custom model to increase the bulk of the suit. I have gotten so far as to determine the use of a 1/100 Gundam Virtue, possible resin casting, and scratch building with pla plate. My japanese is not early sophisticated enough to actually comprehend what the text says. Can anyone…[Read more]
-
Sorry I haven’t a clue, but OMG it’s frickin’ awesome!!!
-
my best guess is alot of extensions using plates.
-
from the images I can see that atleast 3 kits are used in this build, Tallgeese III, Virtue, and the Serpent itself. the waist and shield is Tallgeese, and the legs are Virtue. It’s clear however that the front of the chin is from the serpent itself since the virtue doesn’t have that little knee part. that’s as much as I can tell. No idea how…[Read more]
-
Thank you so much! I love the serpent custom and I want to do something like this since the 90’s 1/100 HG kit is…. well…. 90’s quality. The Bazooka comes with the 1/100 kit btw.
PLUS the extra bulk makes this MS look like formidable juggernaut.
-
Oh and do you have any idea how the mods would have been done?
-
its pretty hard to know exactly what might have been done in any specific mod, but the second image you posted showed a pic of the model put together but unpainted and in that you could see some of the Tamiya masking tape, that tape’s presence would suggest that a modification happened in that area, though in this case I see some tape on the gun…[Read more]
-
-
-
-
-
Archaiel posted an update in the group
Q/A & Help Group 11 years ago -
Archaiel posted an update in the group
Q/A & Help Group 11 years ago -
crzydrunknmunky posted an update in the group
Q/A & Help Group 11 years agoDoes Mr. Mark Setter dissolve Tamiya Acrylic and Future Varnish? I used it today and it completely messed up the paint on that part. Can I used Tamiya’s Enamel clear then?
Also, I hear I can mix flat base with clear in order to get a flat varnish is there a ratio I should be aware of?
Thank you for your answers!
-
Windstrike posted an update in the group
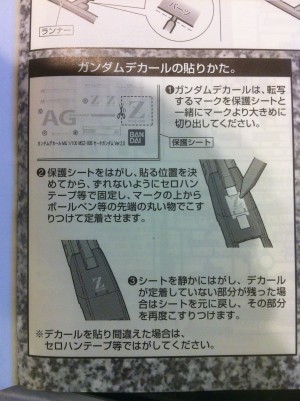
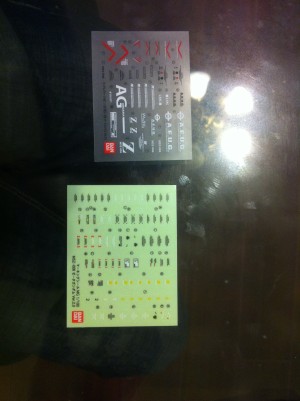
Q/A & Help Group 11 years agoOk guys, I’m building my first MG kit at the moment. I notice I got some decal, the green one looks like some stick, so I know I can just apply them to my kit easy. The clear one is the one I have question about, how can I apply it? I know the instruction tell me to use a blade to cut it to really close to the logo, then i’m lost. Am I suppose…[Read more]
-
those are dry transfer decals. think back to the old “press and rubs” we all had as kits, same concept.
for best usage, cut em out as tight as you can, using a piece of scotch tape to lift it, and place it on your kit, then RUB like mad, slow n firm.
-
Then is it easy to come right off? Do I need to do anything special to make sure they stay on the kit?
-
well, like the old drypress stickers we all had, patience is key, you have to press evenly and get the entire decal down else can tear.
far as staying there, well that’s what the final clear coats for.
-
-
-
From memory @Syd created a tutorial video on the dry transfer decals early in the GunplaTV series. Search through the early episodes and you should be able to find it.
-
Vegeta8259 on youtube has a really good tutorial on decals for beginners if your interested.
-
-
Windstrike posted an update in the group
Q/A & Help Group 11 years ago -
Windstrike posted an update in the group
Q/A & Help Group 11 years ago -
Windstrike joined the group
Q/A & Help Group 11 years ago -
Bakaie joined the group
Q/A & Help Group 11 years ago -
masterDS64 posted an update in the group
Q/A & Help Group 11 years agoHi, got another question?
Ok, clear plastic…say in yellow, can I change this to another color easily WHILE RETAINING TRANSPARENCY or will this cause problems ie color mixing?
-
Depends, what colour you want it to be?
You could try a permanent marker or something like a Tamiya Clear paint, but the underlying yellow will cause interference. Best look at a colour chart, pigment not light, to see if there is a colour that will work.
Might be a bit of trial and error though, so test on the sprue.-
Sorry for late reply, but thanks for the reply, ill have to try it on a sprue, thanks again 🙂
-
Np. Hope you get the desired result.
-
-
-
-
kidd0218 posted an update in the group
Q/A & Help Group 11 years agoAnother questions guys, had alot of help my last one. Thanks!
I recently bought a Satin finish from Vallejo, before this, I’ve only used Matte finish on all of my Gundams. Until, I came across the term silvering. I’ve only notice some of it on my models, but most of the time I don’t.
The question is, will a Satin finish, help prevent silvering…[Read more]
-
tbh, the Only way to prevent silvering is to apply a gloss coat, decal then flat/satin coat over.
decals of anytype work best on a perfectly smooth surface, where flat and satins to get thier look are actually microscopic pittied coats, hense not flat.
so what you need to do is 1 gloss, apply decals then Flat/satin coat parts. Silvering is when…[Read more]
-
Maybe you can try to let the paint to cure for about 24 hour and then apply your decals and then let your decals dry for another 24 hours for it to be completely dry before flat top coating it. As you know, moisture affects the paint job even top coats. I’ve also learned from other tutorials that humid temperature has an effect on paint. I’m not…[Read more]
-
satin is about the same as matt. as the other’s have said you’ll want to use the gloss, apply the transfer then seal with whatever finish you want and that’s the finish you’ll have. a matt or satin finish over a gloss coat will cancel the glossiness.
-
Sorry its a late reply. But thanks guys for helping again!
-
-
-
Richarizardx33 joined the group
Q/A & Help Group 11 years ago -
superxvegito posted an update in the group
Q/A & Help Group 11 years agoHey guys. I was wondering if anyone had a good alternative for a parts separator. I heard guitar picks work OK until they just end up bending out of shape.
Currently I have been using my hobby knife but only for the small mistake or two. I ask because I am in the process of test building my HG Freedom, I would prefer to not risk cutting any of…[Read more]
-
There’s a guitar pick made of metal, I think that’s gonna do the job. goodluck Bro! @superxvegito
-
-
GhosT Quanta posted an update in the group
Q/A & Help Group 11 years agoanyone has any experience with Vallejo model colour paints?
I’m interested in the Model Colour Professional Quality Paint Set on hlj http://www.hlj.com/product/VLJ70178/Sup
to get started on a bit of hand painting. anyone else ever used these? if so what do you think about them? I read that you can just thin them with regular water. in what ratio…[Read more]-
Primer is always best to start with. I use the vallejo range for hand painting and i use their model air range for airbrushing and they are awesome. Thinning down will most likely be a personal preference for most people as it can depend on the effect and/or result you are after. just experiment and see how you go, tho i do find that even the…[Read more]
-
thanks for the info man 🙂 to bad I can’t get any primers like Tamiya or mr. color and such here 🙁
-
if you cant get your hands on the sprays, try airbrushing. vallejo sell a grey primer for the model air range and its pretty good. starting out with airbrushing can be pricey but in the long run its better, i’m not great but its really fun doing it. and its not to hard to learn how.
-
I was planning to get an airbrush set after I started a bit of handpainting. but since they are indeed expensive in the beginning I’m first gonna save some money and maybe next year try to get an airbrush and a compressor. I was thinking of this one http://www.tcpglobal.com/itemdetail.aspx?itemno=ABD+KIT-G22-T
.3mm Dual Act Airbrush 7cc Cup W/ ABD…[Read more]
-
-
-
-
If you have a Games Workshop near you, they do spray paint, used to be just black and white but there is a small selectuon of colours now, and they make a spray matt top coat called purity seal.
You can never thin your paints too much! You can always paint more layers. Also if you can afford too, use a paint medium rather than water to thin your…[Read more]-
thanks for al the info man 🙂 to bad there aren’t any game workshop or any
model building shops around where I live so I have to order everything online 🙁
well maybe I can still find some mineral water somewhere xD-
Np. Tip to priming with just the acrylic paint, thin it down to about 1:5 (paint/whatever you’re thinning with) should give a translucent coat almost a wash. Do 3/4 layers like this will spread the pigment evenly, giving a smoother finish. Again time consuming as you have to let each layer dry. thoroughly, but much better than just plonking on 1…[Read more]
-
-
-
P.p.s. Use different brushes and water pots for normal paint and metallic paint, to prevent cross contamination.
This has happened to me arrgh 🙁
Hand painting can be a lengthy process to get really good results, bur very satisfying 🙂
-
- Load More

Im not familiar with plastruct but the technique is to put the parts together first but dont snap the together- leave a fine gap. Then using thin cement (again, not sure if the plastruct is thick or thin), you use gravity to run the glue between the two parts and then push them together. As you say its evaporating, Id say you are using a thin…[Read more]
Thanks! I was applying the cement to the parts while they were separated, but I’m gonna try it the way described in the video. And yes the plastruct cement is very liquidy, same consistency as water, so I’d assume it was thin cement. Thanks again.
No problems…I was glad I could help!!
http://mxgs.blogspot.com/2010/04/puttyless-seam-line-removal-presanding.html