-

thwalker13 posted an update in the group
Gundam Forums 10 years, 3 months ago -
thwalker13 posted an update in the group
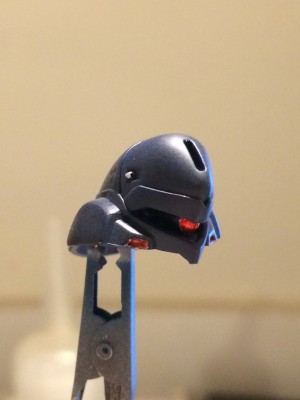
Gundam Forums 10 years, 3 months agoAn update on my Kampfer Amazing build. I just clear coated a few parts, including the head. It’s already dry to the touch and it’s looking pretty good. I’m very tempted to put together the head. I’m anxious to show it off to you guys.
My new cannons also came in today. And just as I feared, the peg that needs to go into the backpack is to small.…[Read more]
-
Show off the head. You know you want to. I’ll show off the head on mine too so you won’t feel lonely, haha.
For the cannons, I wonder if you can just slice the whole peg sections off from the KA’s and cement them to whatever mounts you’ll use.
-
You know you want too come on!
Hopefully the fix on the cannons will be as easy as what Dlinker suggested.Either way I’m looking forward to these pictures the wait is killing me lol
-
-
you could try cutting sections off the runners and then sanding/gluing them to the end of the peg to try and extend them and show off that head! haha
-
What I have decided to do, is instead of using the peg the cannons came with. I’m going to glue in a piece of runner into the slot where the peg is supposed to go. Then fill it in with putty, sand it smooth, and paint it. I figure that should be a lot more secure than gluing an extension onto an existing peg. I’ll just make one for the right side,…[Read more]
-
-
thwalker13 posted an update in the group
Gundam Forums 10 years, 3 months agoI put my 1st layers of paint on the Kampfer last night. I painted all the gray parts and the head, along with the spikes on the shoulders. I’m going to do some detail work on the frame and head. When I get the head all done. I’ll show you guys the custom blue I’ll be using.
-
Sounds like you’r’e going with original colors, haha. Can’t wait to see it.
-
Waiting patiently on these pics myself curious to see this custom blue.
-
-
-
thwalker13 posted an update in the group
Gundam Forums 10 years, 3 months agoWhat you all recommend to glue a hard mounting point? I believe that I’ll have to modify the Kampfer Amazing’s binder brackets to fit the new cannons. So what would you all recommend? I don’t think the cement will hold under the stress. I’m thinking super glue.
-
Which binder brackets are you referring to?
-
I would think superglue it seems pretty strong I’ve yet to use modeling cement yet though so I have nothing to compare it too
-
Dlinker: The pieces that attach the binders to the backpack. I’m thinking that the attachment that comes with the cannons isn’t going to be large enough to do the job.
-
So you’re not going to be using the pegs on those pieces to mount the cannons?
-
Well, the cannons comes with a peg to mount them. But I don’t think it’ll be long enough. So I might have to make it longer or retro fit the ones that come with the Kampfer to the cannons.
-
Wonder if you could use some pla plate to extend it.
-
^ That might work. Get some plastic or brass rods and make them longer that way. Retrofitting the KA’s should work too, if it’s just a matter of moving parts of it around and fusing them together.
-
-
-
-
-
Superglue stinks on model kits. Use plastic model cement, or maybe E6000?
-
-
Bossguy posted an update in the group
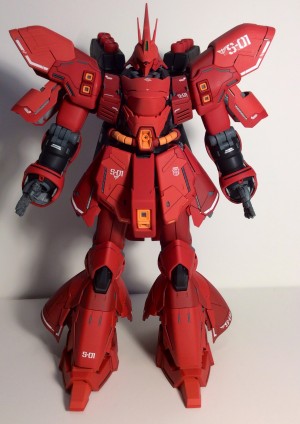
Gundam Forums 10 years, 3 months agoThings are really busy here, and I’ve had almost no time to go onto the web. Here is just a picture of the Sazabi, since I’m impatient. I got a dust piece underneath a waterslide, and it’s bugging me real bad. The thing is, you can’t even see it.
-
That thing looks amazing man. You did an excellent job on this guy.
-
So very pretty…
-
Another good flat finish on this and the decal work is seamless, although the one on the shoulder is showing a bit, but that could be due to the lighting on that area.
Don’t worry about that decal. If it’s hard to see for you, then it’s nearly impossible for everyone else.
-
Thanks guys!
-
-
-
Bossguy posted an update in the group
Gundam Forums 10 years, 3 months ago -
thwalker13 posted an update in the group
Gundam Forums 10 years, 3 months agoHere is an update on my Kampfer. I’ve got everything but the legs and weapons de-nubbed. And I’m about to run out of rods. So, I’m going to get the frame work for the legs, and the thrusters de-nubbed. Then I’m going to paint all the gray parts and thrusters. Detail and clear coat them. That will give me enough rods to finish out the armor pieces.…[Read more]
-
Can’t wait to see the first painted parts. All airbrushed on this, right?
-
Heck yes,good to see you making progress! I’m still waiting on my stuff to ship.
-
-
Yep, all airbrushed.
-
-
thwalker13 posted an update in the group
Gundam Forums 10 years, 3 months agoThe Banshee Norn is finally up for Pre-Order, and the promo images look amazing. Me thinks I’ll get 2 of them.
-
I need only one. And the HG Turn A and RG Exia, of course. But I think I’ll have to wait; got a massive backlog.
-
Why two? It’s not like the HG transforms. Or is it because you want to do one stock and one custom?
-
I have a custom kit in mind. And it will require 2 of the Banshee Norns. The added bonus is I’ll have swappable parts for easy weapon transfers.
-
A Phenix?
-
Similar yes. Just a lot more, demonic.
-
Demenix?
-
-
-
-
-
I’m going to wait for a long time before I get one. It looks great, but somehow I’m all spent in terms of the Unicorn design. I guess that’s what happens when you get four RDs, one of the HGUCs, and the Metal Composite figure. Too many of the design on my shelf.
-
I’m going to get the FA Unicorn in Destroy Mode along with the Banshee Norn. So that will pretty much finish up my Unicorn Collection.
-
Much better idea than the MG version, that’s for sure. Unicorns/Banshees aplenty, haha.
-
Yeah you’re telling me. I have the current HGUC version, So I’m going to get these to finish it all up. Might spring for the FA Unicorn Mode just to say I have them all. haha
-
Why not? You can use the weapons for other kits, haha.
-
^^^ this only reason I want the master grade lol.
I’ve got too many kits on my wish list to worry with that one anytime soon, and my Ka just got ordered. I’ve got a decent backlog right now too so yeah…
-
Your backlog will begin to take a life of its own soon. Next thing you know, it’s become a terrifying horror to gaze upon, haha.
-
I like having a large backlog of kits; it basically means I won’t be bored anytime soon.
-
-
-
-
-
-
-
-
-
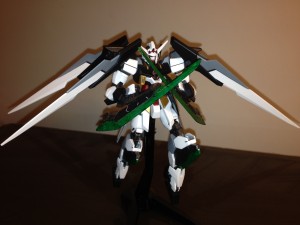
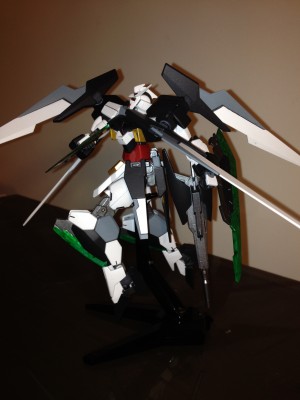
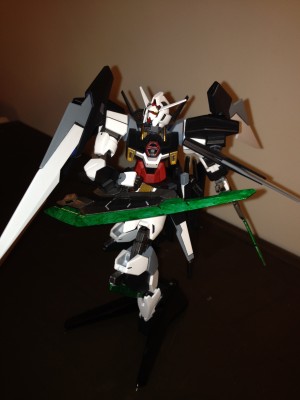
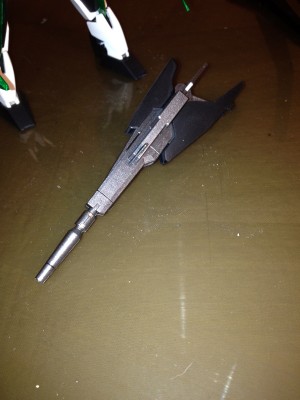
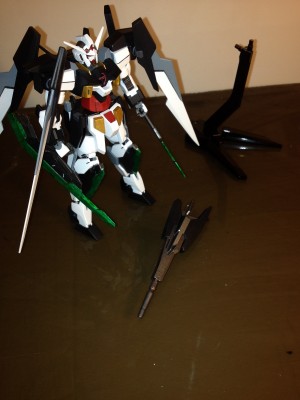
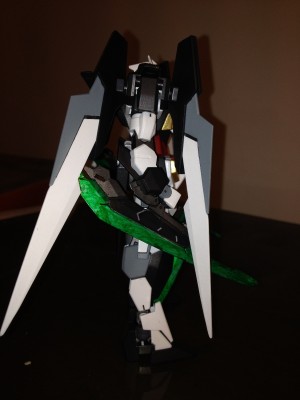
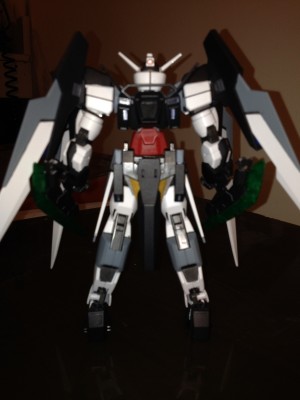
thwalker13 posted an update in the group
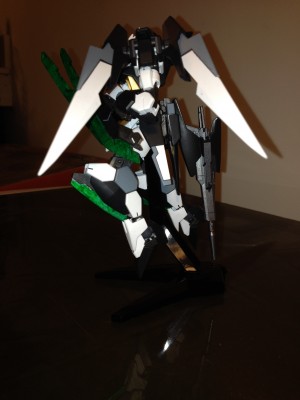
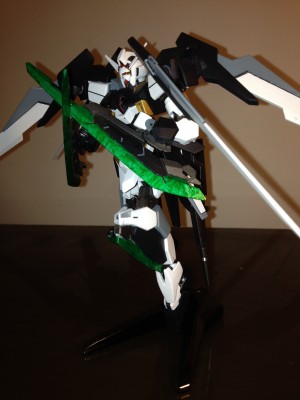
Gundam Forums 10 years, 3 months agoSo, here is my Playing with Plamo contest entry. The AGE-2R “Black Blade”
Looking back, there a few things that I would have done differently. Like I would have airbrushed the clear green instead of hand painting it. It was my 1st ever kit that I have airbrushed. I learned a lot while doing it, which is exactly what I wanted to do. Though I…[Read more]
-
Very good first kit to be airbrushed. I don’t mind the clear green application too much too since it looks nice at certain angles.
-
That looks great. The clear green doesn’t look bad at all, especially when the MS is actually posing with them.
-
I’m sure I said it before but that kit looks great man!
-
-
-
Thanks guys. I’ve put into a bit more of a dramatic pose after the shoot. As if it were rushing forward for a shoulder tackle. I learned a lot from this kit. I hope that I can what learned here and make my Kampfer Amazing look 10x better.
-
I can only hope that my first airbrushing experience ends up looking as good as this. Great job, Walker!
-
Looks good! Which category was this entered into?
-
I entered into the Intermediate.
-
-
looks really good!
-
You just turned this kit from good to awesome! I love the color scheme! It adds a mature and serious feel into it.
-
Thanks a lot guys, overall I’m really happy with how this kit has turned out. Just hope my next one turns out this good or better.
-
-
thwalker13 posted an update in the group
Gundam Forums 10 years, 3 months ago -
thwalker13 posted an update in the group
Gundam Forums 10 years, 3 months ago -
thwalker13 posted an update in the group
Gundam Forums 10 years, 3 months ago -
thwalker13 posted an update in the group
Gundam Forums 10 years, 3 months ago -
thwalker13 posted an update in the group
Gundam Forums 10 years, 3 months ago -
thwalker13 posted an update in the group
Gundam Forums 10 years, 3 months ago -
thwalker13 posted an update in the group
Gundam Forums 10 years, 3 months ago -
thwalker13 posted an update in the group
Gundam Forums 10 years, 3 months ago -
thwalker13 posted an update in the group
Gundam Forums 10 years, 3 months ago -
thwalker13 posted an update in the group
Gundam Forums 10 years, 3 months ago -
thwalker13 posted an update in the group
Gundam Forums 10 years, 3 months ago - Load More