-

Dlinker posted an update in the group
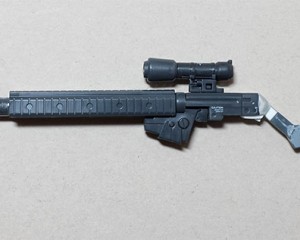
Gundam Forums 8 years, 11 months ago With the clear coat completed on the Zabanya, it was time to return to the second of my three HG projects I started before the KA. I originally planned on using the Koto Sniper Rifle on this kit, but a better idea came to mind. I’ll let the pics speak for themselves. I thought it was a much more appropriate custom weapon.


I am loving those shades of Blue man. And the rifle looks excellent.
Haha, actually, I haven’t painted this kit yet. This is the one I’m planning to try digital camo on. A bit more fixes on welds and then I can prime by the weekend.
That is one sick kit bash for the rifle you’ve got there, D! Even better that it doesn’t look like the rifle’s weighing down the supporting arm any 😀
How did you make the rifle? Anyway looks good. I want to get that kit when it’s in stock at my online store.
That looks great. The gun fits the GM suit so well, you could’ve fooled me if you said that it came with the kit originally.
Certainly fooled me. I thought you had painted it already. But a digital camo sounds like it would look fantastic on that Sniper.
Thanks, man! The rifle is pretty light, only slightly heavier than the standard rifle. It helps a ton that the GM Sniper II’s arms have solid joints. The only thing that may sag is the ball-joint for the trigger hand, but some primer and paint can fix that easily.
I cut out the handle/stock from standard rifle (since it’s the key for having it usable without issue with the kit), fused it to the Gelgoog rifle you can build with the 1/144 System Weapon 002 set with the handle/trigger sawed off, then sawed off the front barrel portion of the Gelgoog rifle and fused in the barrel from a System Weapon 001 Zaku machine gun. I had a leftover silencer from my HGUC Jesta Trio so I put that in instead of the standard end for maximum tacticool effect.
Get the kit when you can, man. It’s pretty darn nice.
Thank you, good sir. I honestly think this rifle is one of my rare strokes of genius so I’m really proud of it and how it came out. Hopefully the transitioning area I made with Apoxie Sculpt between the handle and receiver comes out good when I prime.
The tiny trigger area was a b*tch, though. Had to fix the area three times before settling on something uber simple.
I guess that’s the magic of a bright photo, haha. That and this place doesn’t allow for anything higher-res without external links. I’m going attempt the digital camo on a spoon first and make sure I got the methods down. I’m switch to all lacquer paints on this so any screw-ups will take more time to fix.
Oh wow. That is pretty genius!