-

MohnJadden posted an update in the group
Intermediate Modeler – Modeling Competition 2017 6 years ago Hey guys, I’m here to do my one big giant entry post for the competition. I’d been doing my posts in Imgur since I wasn’t sure what the format was for this group, and now I’m regretting it because I gotta compose One Big Post with all my photos and notes.The format here will be scrolling down from top to bottom. with hyphens between captions to indicate when to go to the next one just in case the forum software doesn’t do double enter spaces.. Sorry about this, but I’d rather not spam a million updates.
For those who want to view it with the captions and images together I’ll post links to the Imgur album that I used to document the work, along with the date when it was posted.
For the contest format I’ll do at least four updates rather than One Giant Update.
Update 1: http://imgur.com/a/InKnz 2/3/17
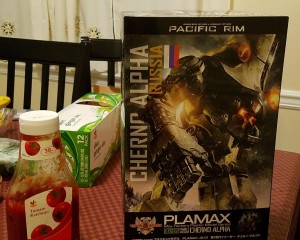
Here’s my entry, the Plamax 1/350 Cherno Alpha from Pacific Rim. It’s a build for a friend, which is cool because I’m running out of display space and my wife isn’t OK with Gunpla and other models taking over the entire nerd room, lol.
Big lad, big box. I didn’t have any bananas to scale it, so it’s next to a 38oz ketchup bottle. It’s the size of a larger Master Grade box. Its parts count is basically on par with a 1/100 no-grade or 1/100 HG (not from IBO). There is no full inner frame, just structurally significant parts. The LEDs are done through a built-in pre-wired box. You don’t need anything other than batteries.
–
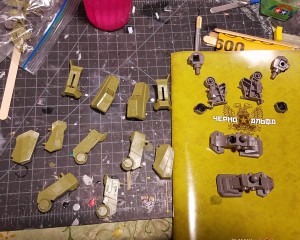
Tonight’s work started with the legs. Molded in two colors, this definitely will benefit from paint. The plastic is decent quality but is a bit softer than Bandai plastic, so err on the side of less use of Xacto blades for nub cleanup. Leave more than enough to progressive sand down and you’ll be fine.
–
To the right, the frame parts, all of which will require seam cleanup. Standard seam filling processes apply just fine.
From top to bottom on the instruction manual:
-Hip joints: seams on the top and visible outside of the parts. Everything above the peg and housing will be visible but doesn’t require cementing into place.
-Knee joint/lower leg and calves section: the only externally visible parts are the small circular section and flat parts below it, along with the large circle which constitutes the knee joint. These will have moderately visible seams and mine had mold lines that paralleled where the seam would be. Should be standard cleanup stuff. The hollowed out parts will have the lower leg armor assembled around them.
The above joint will need to be painted, and the exposed areas masked, before assembling the armor around it.
-Feet: visible seams across the front toe and rear heel area. Not pictured towards the rear heel is a square area which is recessed below a boundary. I’ll probably just putty that in to fill it rather than try to seam a square below the surface.
Of note, there are two separate detailed pieces to make up the soles. There is a piece of armor that goes over the toe, right in the slots, which you can see on the lower foot as pictured.
As to the armor, I set it out to show parts. On the armor, wherever you see a peg, there will be another piece of armor covering seams and gaps. As I mentioned, the plastic is on the softer side, but Max Factory did a very good job erring on the side of getting as many sprue connections onto non-visible edges or pegs. That said, there’s still visible nubs that you want to watch out for. Don’t shave too much, just use progressive wet sanding if you plan on going unpainted.
I mixed up the arrangement of the armor to sections of the leg, so I’ll just cover them based on the instruction manual, which can be found here: http://www.1999.co.jp/eng/image/10411073/70/1
Again, from top to bottom:
-Thighs: the thighs assemble a peg as part of the armor to create the knee joint. The rear will have a visible seam that seems to join at a flat enough angle to do normal seam filling. The thigh armor creates the knee joint by assembling a peg through the hole in the frame part. A piece of armor covers the front seam.
-Lower leg/calf: Some frame looks to be exposed to the rear, but it is covered by flat armor that goes across the frame parts. Towards the front, another armor covers the seam. The edges of the front armor join at a weird angle so it would probably require putty to go seamless, but the fit is tight enough that it could be written off as a panel line or some other intended gap.
Part H6 can probably be omitted and cemented after everything gets painted.
-Feet: there are only two pieces of armor for the feet, one that covers the area above the toe and one that plugs into a polycap between the feet halves. Take care to rotate the polycap away from the upper surface of the foot lest it get cemented into place.
Parts H18/19 constitute the foot spikes and can be painted/detailed separately.
Ugh, it rearranged the photos. Correlate the bottom photo with the top comment and vice versa on up. Sorry about that. No real way around it based on how the system organizes it.