-

wwh0628 posted an update in the group
Beginner Modeler – Modeling Competition 2013. 9 years, 4 months ago WIP 4. Ok, this will be a bit long post. 😀
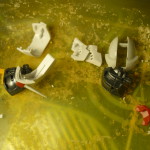
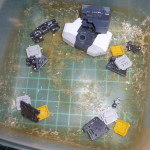
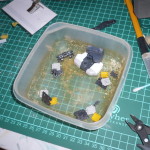
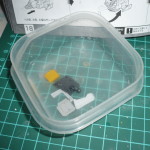
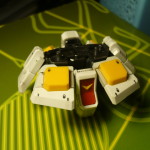
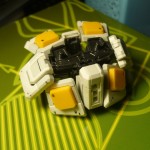
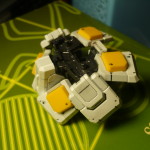
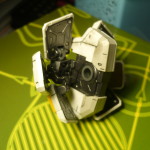
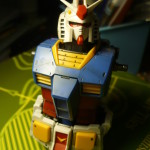
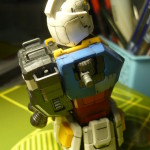
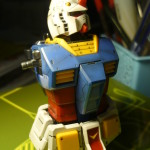
Due to my huge enthusiasm on my kit, I somewhat pull an all-nighter last night. 😀 …very unhealthy and I promise myself that I wouldn’t do it again. I made some mistakes here and there, try some new things and try to improvise, so here they are. I finished the head and the waist.
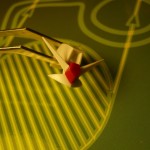
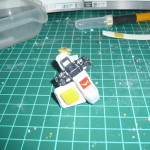
I did some (terrible) panel linings with markers because I have problem with the Gundam marker. Somehow, the ink stop flowing when I panel lines the head and waist. :S Lucky I have two other markers. I bought them few weeks ago out of curiosity, what will happen if I use it for gunpla. Never thought I will use them right now for this project. On the head part, I also made some mistakes. Because of the bad lining, I try to remove the panel lines with the help of acetone. I did it because I read somewhere, I can use acetone to help me removing paints. However, I did it too much so a thin layer of the plastic is melted on the head!! Never again use acetone to clean your kit or do it with precaution and be very careful!! You can see the effect from melting on one of the pictures here. Of course I could just get away and saying it is a battle damage, LOL.
Because of the dirty and bad linings, I decided to apply my tamiya weathering master. I apply it on the edges and on the lines. I learn about this idea from this forum: http://www.gundamuk.com/mechaloungeforums/index.php?topic=2229.0
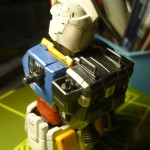
On the area with bad linings, I apply it a little bit more. This is true for the head part. Some terrible linings also spotted on the skirt, but I haven’t apply the weathering there. As explained, the weathering master gives a nice shading effect, so anyhow, I’m happy with it. It is also very easy to use. So although bad things had happened, I’m still happy with the end result. 😀


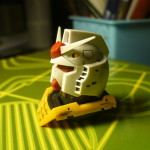
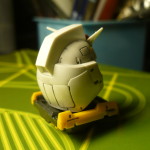

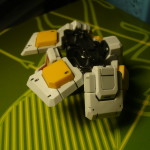

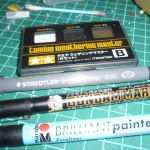

The Tamiya Weathering Master looks great eh?
For panel lining – my best advice is to go to the next level, get some black oil paint and some mineral spirits and make a panel line wash. The oil paint is really easy to clean up after, either with your thumb, or cloth or cotton bud, or in some cases wetting the cloth or bud with some mineral spirits.
How is the black oil paint and mineral spirit is different from black enamel paint and thinner? Are there branded or just generic products of those? I hope it is safer than thinner which might break the plastic if used too much.
It’s different in that it’s vastly easier to clean up! Mineral spirits don’t attack the plastic and you can also use them over acrylic paint or future finish if you’re careful. I just use generic stuff from my oil painting supplies – thinner from the local art shop and some Windsor and Newton Artists’ black oil paint in a small tube.
For pens, I really like the Pilot DR pigment ink pens if you’re going straight onto the pastil model. I just get them from the local art shop. Don’t use any pen on top of a painted model though as they’ll soon get contaminated with paint and dry up. For putting pen on a painted model I’ve had to go to a Rapidograph technical pen, and they’re expensive and tricky to use and clean.
Hi! @GN Yeah it is, the weathering master looks really great and really easy to pull. I’m actually a bit surprised when I see the result. 😀
I don’t know anything about these oil paint and mineral spirit. I’m new in this modeling world. Are Windsor and Newton Artist name of brands? I don’t know if the local shop here sell them. What I found so far in the nearby shops are some acrylic paints (I don’t remember the brand) and Revell’s enamel paints/thinner. To get my Tamiya spray cans and, I have to travel a bit far but maybe they will have these oil paint and the mineral spirit. If this combination will not harm the plastic, then I might think to try it out for the remainder of my kit. I still need to work on both arms and legs. Seeing a kit melting is kind of scary on my level. 😀
I did a lot of the Tamiya Weathering Master on http://graemenattress.com/wp/geara-doga/ and it came out great. I think it’s a super little kit that works really well.
“Windsor and Newton” are a good brand of oil paint. I think any “artists” level paint (the “student” level paints don’t have as much pigment in them, or as finely ground) will be suitable and black oil paint isn’t an expensive colour. You’ll get them at an art shop, not a model shop, but that doesn’t stop them working great on models. I was getting fed up with all manner of pens ( http://graemenattress.com/wp/panel-lining/ ), which is why after doing some reading up on washes decided to go with the oils and had such good success with them.
Mate, that’s an awesome Geara Doga. May I know which weathering master you used and on which part of the kit where you use it? I hardly recognize it because everything seems blend in together. 🙂
Ok, I will look for art shop around. As long as the risk of breaking the plastic is low, then why not trying it out. I guess, I also had enough with these markers and pens. If I can’t find any, then I think, I will go to enamel+thinner combination.
Weathering Master “oil stain” went on practically all the edges. There was some airbrush under-painting too, but the main effect you’re seeing is the weathering master.
Oh no acetone. I’ve read a few times that putting acetone on the plastic will melt it. If you want to remove or clean excess panel lines, try using an eraser. A lot of markers like Gundam markers can actually be removed by them. You can evn use a cotton buds or a sharpen toothpick as well for more detail cleaning.
Yeah, I learned it in the hard way. Next time I won’t use acetone.
This morning before I leave for work, I tried to remove the head armors because I want to sand the melted surface. But apparently some parts were sticked. I think the acetone is flowing in through the perts gap and melted a bit of plastic on the inside. I still remove the armors forcefully though because I need to sanded them. But because of that, now I have a broken part on the inside. 🙁 But well, this is part of learning. I plan to glue the broken part because it is inside and will not be visible from the outside.