-

Chan1990 posted an update in the group
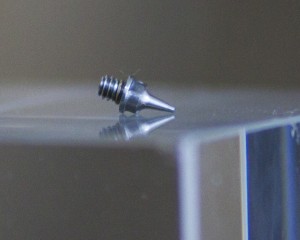
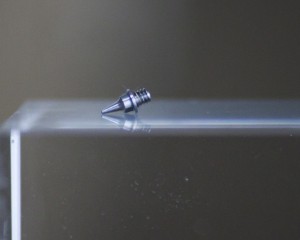
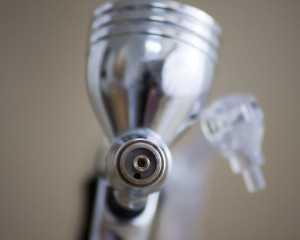
Airbrush and Gunpla! 8 years, 3 months ago Hi everyone, I am new to this group but I was hoping one of you seasoned veterans might be able to answer some of my questions. I’ve been using a Tamiya HG Trigger type for about a year, but recently the threads of the .3mm nozzle have apparently worn out and it no longer works. I am attaching some photos to hopefully show what has happened.Does anyone else have this model or airbrush? Is this problem unique to me, as in, does it look like am I handling it incorrectly? Thanks for any advice!

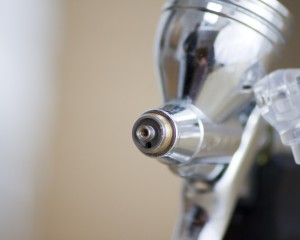
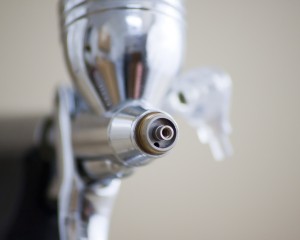
Hi Chan1990. I don’t have that type of airbrush, but looking at the photo off the nozzle it reminded me of an old car I worked on in the past. The wheel studs looked the same way as the thread on your nozzle. Those wheel studs where over torqued year in year out, changing from winter tires to summer tires. So it looks to me you over tightened the nozzle more than once. As I’ve seen in some reviews on airbrushes in the past when looking for an airbrush myself, I’ve come to notice that this type of nozzle needs to be “bolted” on finger tight. This means placing only one finger on the spanner and use the force of only that finger to tighten the nozzle, making sure not to use the wrist or arm making the tightening motion.
You could try ordering a replacement nozzle, dip it in some oil, grease or some other form of lubrication and carefully thread it in the airbrush, twisting it in thread by thread, meaning on full or half twist clockwise, than the the same twist counter clockwise. The second twist a half turn further than the first turn and than twisting the nozzle out again. Every second turn wipe off the lubricant from the nozzle and lube it again. The lube will catch most of the metal particles. When not removing the dirty lube from time to time, it will obstruct the threads.
The most ideally situation would be to change the inner thread on the nozzle. This will make the above process not necessary, but I don’t know if this is feasible with your airbrush. The next best thing would be ordering two replacement nozzles. One for cleaning the thread, the second one to actually use after the thread is re-threaded. The thread on the nozzle that is used for the re-threading process may become damaged somewhat and can cause the same issue over time, even when using the one finger technique to tighten the nozzle.
I hope this helps you out. Best of luck
He could also try a rather unconventional fix since it looks like the seal is also in pretty bad condition. Get a masking liquid. Put it in place of the seal tighten the noozle (some of the masking liquid would spill out. Let it cure, then gently remove the overspill. The connection is once again tight and the airbrush should work well once again. Sorry for my english but i hope you got my explanation of this “fix”
Thanks for the replies guys. Teetee580, you were exactly right that I over-tightened it many times. Could you explain a bit more what the purpose of tightening and loosening it with the lubricant does? I understand what you are saying but I am still not exactly how that helps, since I’m not sure what specific problems to which parts my over-tightening has caused.
To clean it I was removing and reattaching the nozzle every time I used it, so when I looked back in the instruction sheet again I felt like an idiot where it clearly says “frequent removal and attachment of the nozzle will wear sealant on its thread, resulting in back flush of air. Remove only when necessary”.
So I’ve ordered a replacement nozzle. Even I can see that the thread on the nozzle is damaged, but do you think there is anything wrong with the thread inside the body itself? Thanks again for the tips, I will definitely have to use the one finger spanner method.
@Jaberwak, that’s a great suggestion. What I use for example fitting oil lines for a turbo setup is liquid gasket. This is especially made to perform the task. Thanks for the input
You’re welcome.
In my opinion your problem is caused by miss engineering on Tamiya’s side. I mean, relying on thread to seal in stead of an o-ring or teflon ring…? I too remove the nozzle after every paint job for cleaning. And every time I clean it, there is some residue of paint in it. So I’m sure there is in yours too… Glad I didn’t order one….
Anyways, the oil is to catch any cuttings as you are tapping new thread in the airbrush.
It also helps the thread to slide more effectively through the damaged threads in the airbrush itself. Not too sure if the thread of the airbrush is damaged, that depends if the metal used for the airbrush is the same metal that’s used to make the nozzle from. If the metal of the airbrush is of a stronger metal, the damage on the thread won’t be that significant, but I’m sure there will be some damage on the thread of the airbrush itself.
When tightening and loosening the nozzle one twist at a time, you’re making sure it doesn’t get stuck and not cross threading it. It also ensures any burrs from the damaged thread in the airbrush not to get stuck in the thread itself. Note that you visually have to check this after 1.5 or 2 turns with the nozzleand remove it when there is. This is a good time to clean the thread of the nozzle and to put some new lube on it. If you can get in there, clean the thread in the airbrush at the same time. If this isn’t an option, get some brake cleaner in an aerosol can. Just spray it in, let it soak for a few seconds and hook the airbrush to the compressor, then blow the residue out. This also has to be done when the process is completed.
When all is done successfully, the nozzle will thread in the airbrush with ease.
And as Jaberwak suggested, use some form of sealant on the thread of the nozzle. I suggest using a liquid gasket which is used in the automotive world. This will stay somewhat flexible and makes sure you can take the nozzle out several before having to apply it again and is resistance to most any sort of fluid. Just use a little bit. Covering the whole thread may obscure the nozzle or the air passage in the airbrush. Just a little bit on the first winding of the thread is enough and when threading the nozzle in will spread “upwards” along the thread of the nozzle. And when applying it on the nozzle make sure the sealant is in between the first two windings on the thread and doesn’t arise above the top section of the thread. So just use a very small amount. Let it dry for a few hours before taking the nozzle out again or use the airbrush to paint. This ensures the sealant will cure sufficiently. When taking the nozzle out the first time after having applied the sealant it will take some force to loosen it. It also will make twisting the nozzle in and out somewhat heavier. I hope this makes sense, as it is hard to explain it without the use of pictures….
Hopefully this answers your question and all works out for you. If you have any more questions or need more explaining, just let me know. Good luck