-

VentureGunpla commented on the post, Gunpla TV – Episode 148 – RG Exia Build! 8 years, 10 months ago
Think I have to pick up a RG Exia just for that sweet frame and detail parts.
-
VentureGunpla posted an update in the group
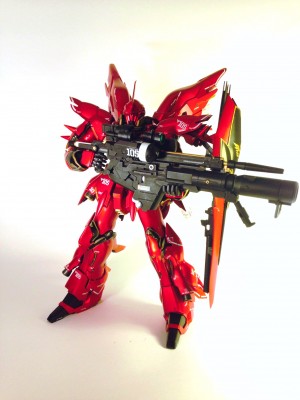
Beginner Modeler – Modeling Competition 2013. 9 years, 3 months agoMaybe it’s just the fact that I’ve been staring at a grey inner frame for a month but when I started putting on Sinanju’s armor I think I got a little too giddy. It’s not all the way done, but it’s pretty much there. Gotta be super happy with how the paint job turned out and all. Thanks for all the encouragement on the way!
I have to say I’m a…[Read more]
-
VentureGunpla posted an update in the group
Beginner Modeler – Modeling Competition 2013. 9 years, 3 months ago -
VentureGunpla posted an update in the group
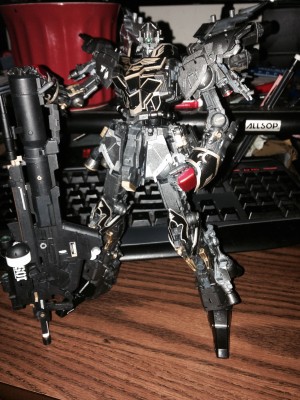
Beginner Modeler – Modeling Competition 2013. 9 years, 3 months agoA fun little update as we get into the thanksgiving week in the states. I just finished up the weapons which was incredibly frustrating as the hyper bazooka’s barrel just wants to scrape paint off of everything. The beam rifle itself looks fantastic with a little bit of gold detail.
Hope everyone well on their builds and a happy thanksgiving to…[Read more]
-
VentureGunpla posted an update in the group
Beginner Modeler – Modeling Competition 2013. 9 years, 3 months ago -
VentureGunpla posted an update in the group
Beginner Modeler – Modeling Competition 2013. 9 years, 3 months ago -
VentureGunpla posted an update in the group
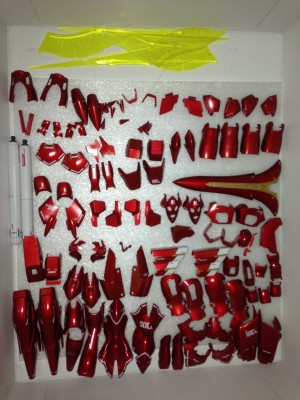
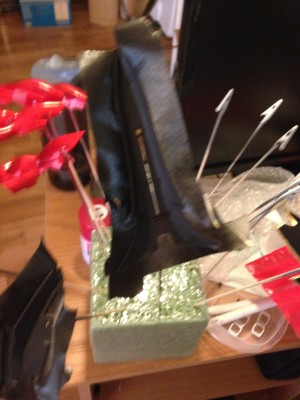
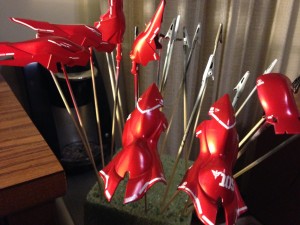
Beginner Modeler – Modeling Competition 2013. 9 years, 3 months agoSmall but big update on my end. I finally finished painting every one of the primed pieces with the gold, clear red, then clear coat. I then decaled and sprayed another clear coat over all the pieces.
After ~200 decals we’re finally nearing completion.
The major set back is that I managed to lose a really critical piece, but I’ll either be…[Read more]
-
Excellent job. All of those parts look beautiful.
-
Holy crap. The final build is going to look amazing based on this!
-
Great, now my OCD is wanting to go and try this paint technique on the HGUC 1/144 version I haven’t bought yet, I’ll let you know in a month when I my OCD has gone and bought it for me.
-
-
-
VentureGunpla posted an update in the group
Beginner Modeler – Modeling Competition 2013. 9 years, 3 months ago -
VentureGunpla posted a new activity comment 9 years, 3 months ago
Hey, Good luck on your Sinanju build! It’s a real challenge but it’s pretty fun along the way. I would not actually recommend the waterslide decals for the trim as they look really cheap and wrinkly even after mark softer (not to mention they tear really easily). If you’re not planning on reverse washing the parts I’d recommend cutting the gold…[Read more]
-
Styraxtwinblade and
VentureGunpla are now friends 9 years, 3 months ago -
VentureGunpla posted a new activity comment 9 years, 4 months ago
Tamiya ts-21 gold lacquer aerosol can.After I sprayed the clear red it lost some shine but adding the clear gloss really shined it up again.
-
Thanks. Wonderful job, man.
-
-
VentureGunpla posted a new activity comment 9 years, 4 months ago
Yep, the Sinanju’s shield is a real bastard to paint, but if you plan on cleaning it up with some black gundam marker, and clear coating it, clear coating it almost perfectly hides the gundam marker’s slightly different finish. Take your time with it!
-
What Venture said. Take your time with it. I would go over it again, because gnome parts look a little splotchy.
-
-
VentureGunpla posted a new activity comment 9 years, 4 months ago
Take your time removing nub marks! If you’re not planning on painting that’ll be your most important step. Don’t cut too close to the piece on the runner and don’t apply much pressure when cutting the nubs!
-
VentureGunpla posted a new activity comment 9 years, 4 months ago
Even if it looks “smokey” from your view it looks pretty flat to me in the pictures. Sometimes you have to do two coats of flat to actually get the best effect. From the pictures it looks good!
-
VentureGunpla posted a new activity comment 9 years, 4 months ago
Cool! The clear parts look really good and don’t have any visible stroke marks. How hard was it to apply all the stickers? I really hate applying stickers and being foil its easy to mess them up ._. Glad your valvrave turned out so nice!
-
Thanks for the comments!
I’ll have to say that the stickers took as much concentration (or more) as when I was cleaning the nubs and cleaning up.
The problem is that they are nearly all long and thin, so it is very easy to spot even a slight misalignment @3@
-
-
VentureGunpla posted a new activity comment 9 years, 4 months ago
All you need is 50 or above with low humidity. It’s been cold recently but I’ve still managed to spray in the afternoon with good results. Make sure you always overspray and at least make 2 passes with the can. If you have a bit of sun you can see clearly where the spray hit!
-
VentureGunpla posted a new activity comment 9 years, 4 months ago
I would try finding some HGUC decals for your Sinanju. You can pick and choose which ones you want to put on and they really add a bit extra to the Sinanju especially if you like the look of the Ver. Ka style! Not to mention waterslide decals are pretty fun to put on.
-
I’ve actually got some decals laying around from an RG Char’s Zaku, and I was going to see what I could do with those.
-
-
VentureGunpla posted an update in the group
Beginner Modeler – Modeling Competition 2013. 9 years, 4 months agoI hurried to spray a gloss clear on the pieces I had already painted so I could decal while the cold wave passed. I bought some 3rd party decals because every site was out of the MG Ver. Ka decals ;;. They’re a lot more white and red than the bandai decals but still not bad. I used just my krylon gloss clear and honestly it worked great. Krylon…[Read more]
-
Quite an awesome job you did there. What did you use for paint underneath the clear red?
-
Tamiya ts-21 gold lacquer aerosol can.After I sprayed the clear red it lost some shine but adding the clear gloss really shined it up again.
-
Thanks. Wonderful job, man.
-
-
-
-
VentureGunpla posted an update in the group
Beginner Modeler – Modeling Competition 2013. 9 years, 4 months ago -
VentureGunpla posted an update in the group
Beginner Modeler – Modeling Competition 2013. 9 years, 4 months ago - Load More

That looks wonderful!
That gold base coat really works a treat in the light.
That looks awesome! Just ordered mine and I think its arriving tomorrow! From HLJ of course. heeh